


Section 6: Setting Up - Macintosh
AXIS 540/640 User’s Manual 65
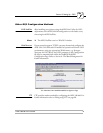
LaserWriter 7.0
Printer Driver
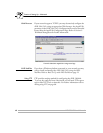
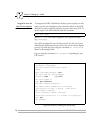
Open the Chooser window by starting the Chooser from the Apple
menu. Follow these steps to choose a printer:
1. Click the LaserWriter icon.
2. If your network has more than one zone, click on the zone you
want. If your network has no zones, this box does not appear.
3. Click the name of the printer you want.
The default AXIS 540+/542+ printer names are shown as:
AXIS<nnnnnn>_<port>, where <nnnnnn> is the last six digits of
the AXIS 540+/542+ serial number, and <port> is LPT1. For
example: AXIS100086_LPT1
4. Click the close box.
This completes the configuration and closes the Chooser.
Repeat this procedure for each Macintosh on the network using the
AXIS 540+/542+.
LaserWriter 8.0
Printer Driver
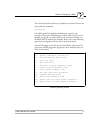
Open the Chooser window by starting the Chooser from the Apple
menu. Follow these steps to choose a printer:
1. Click the LaserWriter 8.0 icon.
2. If your network has more than one zone click on the zone you
want. If your network has no zones, this box does not appear.
3. Click the name of the printer you want.
The default AXIS 540+/542+ printer names are shown as:
AXIS<nnnnnn>_<port>, where <nnnnnn> is the last six digits of
the AXIS 540+/542+ serial number, and <port> is LPT1. For
example: AXIS100086_LPT1
4. Click the ‘Setup...’ button, and then the ‘Auto Setup’ button. If
the printer supports bi-directional printing and the appropriate
PPD file is available, the installation will now be performed
automatically and you should proceed directly to step 6.
However, if this is not the case, the PPD file must then be selected
manually, as described in step 5.