


16
english
deutsch
francais
español
Eine Reihe von fixen und Zoom-Linsen können erworben werden,
so dass die meisten Anwendungen, sowohl für Vorder- als auch
Rückprojektionen, abgedeckt werden. Die Linsen werden mit
Strom versorgt und in einer leicht einzubauenden Bajonetthalterung
eingesetzt.
Schalten Sie alle Geräte aus, bevor Sie die Einrichtung
vornehmen, damit die Funktion korrekt abläuft.
Während dem Einbau und Wechsel der Linsen ist zu bedenken,
dass die Optik Staub und Fremdkörpern ausgesetzt ist, solange
die Linsen nicht im Gerät eingesetzt sind. Lassen Sie die Öffnung
für den Linseneinsatz nicht länger als für den Austausch der Linsen
erforderlich geöffnet. Wird keine Linse eingesetzt, setzen Sie
immer die Schutzhaube auf, um zu verhindern, dass Staub und
Fremdkörper in die innere Optik gelangen.
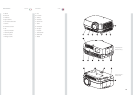
Nehmen Sie den Projektor nie ohne Linsen in Betrieb.
A Nehmen Sie die Schutzhaube vom Bajonettverschluss ab, indem
Sie den Drehknopf gegen den Uhrzeigersinn drehen.
B Nehmen Sie die hinteren Linsendeckel ab.
C Setzen Sie die Projektionslinsen unter Verwendung des
Bajonettverschlusses ein; beachten Sie dabei die roten
Einsetzmarkierungen.
D Drehen Sie die Linsen kräftig im Uhrzeigersinn, bis sie mit einem
Klick einrasten.
E Nehmen Sie die Deckel von den Projektionslinsen ab. Wenn Sie
den Projektor einschalten ohne die Linsendeckel abzunehmen,
können diese Schmelzen und nicht nur die Linsendeckel, sondern
auch die Projektionslinsen und daneben liegenden Teile Schaden
nehmen.
F Zum Wechseln der Linsen werden an erster Stelle ie eingesetzten
Linsen durch Drücken des Freigabeknopfs und Drehen der linsen
gegen den Uhrzeigersinn, bis sie lose sind, herausgenommen.
Ziehen Sie die Linsen heraus.
Setzen Sie neue Linsen gemäß der obigen Beschreibung ein.
Un choix d’objectifs fixes et zoom est disponible pour couvrir la
plupart des applications, à l’avant comme à l’arrière Les objectifs
sont mécaniques et équipés d’un montage à baïonnette pour
faciliter l’installation.
Eteignez tout le système avant l’installation pour un
fonctionnement correct.
Quand vous montez ou changez les objectifs, sachez que le
système optique est exposé à des particules étrangères et à la
poussière tant que l’objectif n’est pas fixé à l’appareil. Ne laissez
pas la monture de l’objectif ouverte plus longtemps que nécessaire
quand vous changez l’objectif. Si un objectif n’est pas monté,
mettez toujours le couvercle de protection pour empêcher la
poussière et les particules étrangères d’entrer dans le système
optique interne.
Ne jamais déplacer le projecteur sans lentille montée.
A Enlevez le couvercle de protection du montage à baïonnette en
tournant le bouton en sens inverse des aiguilles d’une montre.
B Enlevez le cache optique arrière.
C Fixez l’objectif de projection dans le montage à baïonnette, en
vous aidant des repères rouges d’introduction.
D Tournez fermement l’objectif dans le sens des aiguilles d’une
montre jusqu’au click d’arrêt.
E Enlevez le cache optique de l’objectif de projection. Si vous
allumez le projecteur en laissant le cache optique, celui-ci peut
fondre, endommageant non seulement le cache optique, mais
aussi l’objectif de projection et les pièces autour.
F Pour changer l’objectif, enlevez d’abord l’objectif actuel en
poussant le bouton d’ouverture et en tournant l’objectif en sens
inverse des aiguilles d’une montre jusqu’à ce qu’il se dégage.
Sortir l’objectif.
Introduire le nouvel objectif comme décrit au-dessus.
Dispone de una gama de lentes fijas y de zoom (foco variable)
para abarcar la mayoría de las aplicaciones, tanto frontales como
de transparencia. Las lentes llevan una montura de bayoneta para
facilitar su instalación.
Apague el equipo antes de instalar la lente para un
funcionamiento adecuado.
Al montar y cambiar las lentes, tenga en cuenta que el sistema
óptico está expuesto al polvo y a partículas extrañas siempre que no
estén acopladas al sistema. No deje la montura de la lente abierta
más tiempo del necesario durante el cambio. Si la lente no está
montada, coloque siempre la tapa de protección para evitar que se
introduzca polvo o partículas extrañas en las piezas ópticas internas.
Nunca ponga en marca el proyector sin la lente
colocada.
A Quite la tapa de protección de la montura de bayoneta girando el
botón en sentido contrario a las agujas del reloj.
B Quite la tapa de la lente posterior.
C Acople la lente de proyección utilizando la montura de bayoneta y
observando las marcas de inserción rojas.
D Gire la lente firmemente en el sentido de las agujas del reloj hasta
que se detenga con un clic.
E Quite la tapa de la lente de la lente de proyección. Si enciende el
proyector con la tapa en su sitio, ésta puede fundirse dañando
no sólo la tapa sino también la lente de proyección y las piezas
circundantes.
F Para cambiar la lente, primero quite la lente actual presionando
el botón de liberación y girando la lente en sentido contrario a las
agujas del reloj hasta aflojarla. Saque la lente.
Inserte la nueva lente como se ha descrito anteriormente.
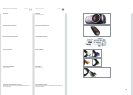
A range of fixed and zoom lenses is available to cover most
applications, both front and rear. The lenses are powered and fitted
with a bayonet mount for ease of installation.
Switch off all equipment before setting-up for proper
function.
When mounting and changing lenses, be aware that the optical
system is exposed to dust and foreign particles as long as the lens is
not attached to the system. Do not leave the lens mount open longer
than necessary to change lens. If a lens is not mounted, always insert
the protection lid to avoid dust and foreign particles entering the
internal optics.
Never run the projector without lens mounted.
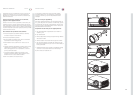
A Remove the protection lid from the bayonet mount by turning the
knob anti-clockwise.
B Remove the rear lens cap.
C Attach the projection lens using the bayonet mount, observing the
red insertion marks.
D Turn the lens firmly clockwise until it stops with a click.
E Remove the lens cap from the projection lens. If you switch the
projector on with the lens cap in place, the lens cap may melt,
damaging not only the lens cap, but also the projection lens and
surrounding parts.
F To change lens, first remove the curret lens by pushing the release
button and twisting the lens counter-clockwise until it comes loose.
Pull the lens out.
Insert the new lens as described above.
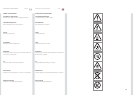
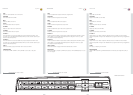
OPTIONAL LENSES LINSEN ALS OPTION LENTILLES EN OPTION LENTES OPCIONALES