


44
english
deutsch
francais
español
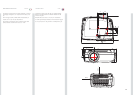
SWITCHING ON AND OFF
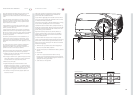
After setting up, switch on all equipment. The projector can be
controlled by the keypad, by the remote control or using the RS232
or LAN interfaces. To switch the projector on, firmly press the POWER
key on the keypad or the remote control. The STATUS indicators will
turn from yellow to green when the unit is switched on, then stabilize
on permanent green either both LAMP1 and LAMP2, or either one,
depending on the lamp operation setting selected.
When using the remote control, either all or select individual units may
be addressed, see the SETTINGS sub menu - ID RC. By activating
the RC ID, individual control of units in a multiple-unit set-up is then
made possible.
The keypad will light up so that all accessible funtions are lit yellow.
Functions that are selected will turn green.
If the STATUS indicators are flashing yellow, please wait until they turn
permanent yellow. Issue the PIN code if activated.
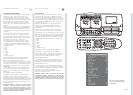
When only one source is connected, the projector will auto-detect
that source. If more sources are connected, the projector will search
for the next active source according to the following list, provided that
SOURCE SCAN is activated in the INSTALLATION sub menu (see
description of menu system):
• VGA
• BNC
• DVI-D
• HDMI
• C-video
• S-Video
• YPbPr (Component)
Select source by pressing the direct access source keys on the
keypad or the direct source selection keys on the remote control. Only
sources that are active will be displayed.
If no source is active, searching messages will appear on the screen.
If no source is active for a long time, the projector will go in standby
mode if DPMS (Display Power Management Signalling) is enabled in
the SETTINGS sub menu. The STATUS indicators will turn from green
to flashing yellow, then permanent yellow. The projector will turn back
on if at least one source is (re-)activated. The power-down function
can be disabled via the menu system. See DPMS in the SETTINGS
sub menu.
To switch the projector off, firmly press the POWER button on the
keypad or the remote control, and confirm with a second press. The
STATUS indicators will turn from green to flashing yellow, then yellow
when completely switched off. You may not switch the unit on while
the STATUS indicator is flashing yellow. Please wait until the indicator
is permanent yellow.
CAUTION! Connecting sources to a powered projector may
result in product failure. It is recommended that the power
cable connector (projector-end) or the mains power socket are
accessible whilst the product is in use to enable mains power
to be disconnected or switched off when connecting source
devices. This should be considered during product installation.
USING THE PROJECTOR EINSATZ DES PROJEKTORS UTILISATION DU PROJECTEUR UTILIZACIÓN DEL PROYECTOR
EIN- UND AUSSCHALTEN
Nach der Einrichtung, müssen alle Geräte eingeschaltet werden.
Der Projektor kann über das Tastenfeld, die Fernbedienung
oder die RS232- bzw. LAN-Schnittstellen gesteuert werden.
Zum Einschalten des Projektors, drücken Sie fest auf die Taste
STROMVERSORGUNG auf dem Tastenfeld oder der Fernbedienung.
Der STATUS Anzeiger werden von Gelb zu Grün drehen, wenn die
Einheit angeschaltet ist, dann stabilisieren auf permanentem Grün
entweder sowohl LAMP1 als auch LAMP2, oder jedes einer, der
vom Lampenbetrieb abhängt, der ausgewählt setzt.
Beim Benutzen der Fernbedienung, entweder alle oder auswählt
einzelne Einheiten angeredet werden dürfen, Siehe das
EINSTELLUNGEN Unteres Menü - ID RC. Durch Aktivieren der
RC ID, einzelner Steuerung von Einheiten in einer Mehrfach-
einheitsaufstellung ist dann möglich gemacht.
Der Tastatur wird aufleuchten, damit alle zugänglich funtions Gelb
angezündet sind. Funktionen, die ausgewählt sind, werden Grün
drehen. Blinkt die Anzeige STATUS gelb, müssen Sie warten, bis
sie kontinuierliche gelb leuchtet. Geben Sie den PIN-Code ein, falls
dieser aktiviert ist.
Ist nur eine Quelle angeschlossen, so erkennt der Projektor diese
automatisch. Sind mehrere Quellen angeschlossen, sucht der
Projektor die folgende aktive Quelle nach der nachstehenden
Liste, vorausgesetzt die Option QUELLE SCANNEN ist im
Untermenü INSTALLATION eingestellt (siehe die Beschreibung des
Menüsystems):
• VGA
• BNC
• DVI-D
• HDMI
• C-Video
• S-Video
• YPbPr (Komponente)
Schalten Sie mit Hilfe der Taste SRC auf dem Tastenfeld bzw. der
Fernbedienung zwischen den verschiedenen Quellen um. Es werden
nur aktive Quellen angezeigt.
Ist keine Quelle aktiv, so erscheinen auf dem Bildschirm
Suchmeldungen. Ist längere Zeit keine Quelle aktiv, schaltet der
Projektor in den Standby-Betrieb um, vorausgesetzt die Option
DPMS (Stromsparbetrieb) ist im Untermenü EINSTELLUNGEN auf
EIN gestellt.
Die Anzeige STATUS schaltet von Grun auf blinkend Gelb und
dann auf Gelb. Der Projektor schaltet wieder zurück, wenn
zumindest eine Quelle (erneut) aktiviert wird. Die Abschaltefunktion
kann im Menü deaktiviert werden.Siehe DPMS im Untermenü
EINSTELLUNGEN.
Zum Ausschalten des Projektors, drücken Sie fest zwei Mal auf
die Taste STROMVERSORGUNG auf dem Tastenfeld oder der
Fernbedienung (um zu bestätigen, dass Sie das Gerät wirklich
ausschalten möchten). Die Anzeige STATUS schaltet von Grun auf
blinkend Gelb und dann auf Gelb, wenn das Gerät ausgeschaltet
wird. Das Gerät kann nicht wieder eingeschaltet werden, solange
die Anzeige STATUS gelb blinkt. Warten Sie bitte, bis die Anzeige
kontinuierlich gelb leuchtet.
VORSICHT! Der Anschluss von Quellen an einen in Betrieb befindlichen
Projektor kann Produktausfall verursachen. Es ist ratsam, dafür Sorge
zu tragen, dass der Stromkabelstecker (Projektor-Ende) oder die
Netzsteckdose während des Betriebs des Produkts zugänglich ist, damit
die Netzstromversorgung während des Anschlusses von Quellengeräten
unterbrochen bzw. abgeschaltet werden kann. Bei Installation des
Produkts unbedingt auf Obiges achten.
CONEXIÓN Y DESCONEXIÓN
Después de la instalación, encienda todo el equipo. El proyector
se puede controlar mediante el teclado, el mando a distancia o
utilizando las interfaces RS232 o LAN. Para encender el proyector,
pulse con firmeza el botón POWER del teclado o del mando a
distancia. Los indicadores del ESTADO girarán del amarillo a
verde cuando la unidad es encendida, entonces estabiliza en la
permanente verde o tanto LAMP1 como LAMP2, o cualquier uno,
dependiendo de la operación de lámpara que pone seleccionado.
Cuando se usa el mando a distancia, o todo o selecciona unidades
individuales pueden ser dirigidas, ven los AJUSTES sub menú - ID
RC. Activando el RC identificación, control individual de unidades en
un sistema de múltiple-unidad entonces es hecho posible.
El teclado numérico se iluminará para que todo el funtions accesible
sea encendido amarillo. Las funciones que son seleccionadas
girarán verde. Si el indicador de ESTADO está amarillo intermitente,
espere a que se quede en amarillo fijo. Introduzca el código PIN si
está activado.
Cuando sólo hay una fuente conectada, el proyector detectará
esa fuente automáticamente. Si hay más fuentes conectadas, el
proyector buscará la siguiente fuente activa de la lista indicada a
continuación, siempre que BÚSQUEDA DE FUENTES esté activado
en el submenú INSTALLACIÒN (véase la descripción del sistema
de menús):
• VGA
• BNC
• DVI-D
• HDMI
• C-Video
• S-Video
• YPbPr (Componente)
• Seleccione las fuentes pulsando los botones SRC del teclado o
las teclas de selección de fuente directa del mando a distancia.
Sólo se mostrarán las fuentes que estén activas.
Si no hay ninguna fuente activa, la pantalla indicará que se están
buscando mensajes. Si no hay ninguna fuente activa durante mucho
tiempo, el proyector entrará en modo de espera si en el submenú
AJUSTES se ha puesto DPMS (ahorro de energía) en ON.
El indicador de ESTADO pasará de verde a amarillo intermitente y
luego a amarillo. Se volverá a encender el proyector si se (re)activa
al menos una fuente. La función de apagado puede desactivarse
en el menú.
Véase DPMS en el submenú AJUSTES.
Para apagar el proyector, pulse firmemente dos veces el botón
POWER del teclado o del mando a distancia (para confirmar que
realmente desea apagar el aparato). El indicador de ESTADO pasará
de verde a amarillo intermitente y luego a amarillo al apagarse. No
se puede encender el aparato cuando el indicador de ESTADO está
amarillo intermitente. Espere a que se quede en amarillo fijo.
¡PRECAUCIÓN! La conexión de fuentes a un proyector bajo corriente
puede causar un error en el producto. Se recomienda que el conector
del cable de alimentación (cabo de proyector) o la toma de alimentación
principal sean accesibles mientras el producto se utiliza para permitir el
apagado o la desconexión de la alimentación principal en el momento de
conectar dispositivos de fuente de energía. Hay que tenerlo en cuenta
durante la instalación del producto.
MISE EN MARCHE ET ARRÊT
Après l’installation, allumez tout le système. Le projecteur peut être
commandé par le clavier, par la télécommande ou par les interfaces
RS 232 ou LAN. Pour allumer le projecteur, appuyez fermement
sur le bouton POWER du clavier ou de la télécommande. Les
indicateurs de STATUT tourneront du jaune à vert quand l’unité est
allumé, alors stabiliser sur permanent vert ou LAMP1 et LAMP2, ou
ou l’un, dépendre de l’opération de lampe qui règle choisi.
En utilisant la télécommande, tous ou choisit des unités individuelles
pourraient être adressées, voit les PARAMETRES sous menu - ID
RC. En activant le RC ID, le contrôle individuel d’unités dans un
montage de multiple-unité est alors fait possible.
Le pavé numérique allumera sur pour que tout le funtions accessible
est allumé le jaune. Les fonctions qui sont choisis tourneront vert.
Si l’indicateur STATUT clignote jaune, patientez jusqu’à ce qu’il
devienne permanent. Tapez le code PIN s’il est activé.
Quand une seule source est connectée, le projecteur détecte
automatiquement cette source. Si plusieurs sources sont
connectées, le projecteur cherche la prochaine source active selon
la liste suivante, à condition que BALAYAGE DE SOURCES soit
sur ON dans le sous-menu INSTALLATION (voir la description du
menu) :
• VGA
• BNC
• DVI-D
• HDMI
• C-Vidéo
• S-Vidéo
• YPbPr (Composante)
Choisissez parmi les sources en appuyant sur les boutons SRC du
clavier ou sur les touches de sélection directe des sources sur la
télécommande. Seules les sources actives sont affichées.
Si aucune source n’est active, recherchez dans les messages qui
apparaissent sur l’écran. Si aucune source n’est active pendant
longtemps, le projecteur se met en mode veille si DPMS (économie
d’énergie) est sur ON dans le sous-menu PARAMÈTRES.
L’indicateur d’ETAT passe du vert au clignotant jaune, puis au jaune
permanent. Le projecteur est rallumé si au moins une source est
(ré) activée. La fonction hors-tension peut être désactivée dans le
menu.
Regardez DPMS dans le sous-menu PARAMÈTRES.
Pour éteindre le projecteur, appuyez fermement deux fois (pour
confirmer que vous voulez vraiment éteindre l’appareil) sur le bouton
POWER du clavier ou de la télécommande. L’indicateur d‘ETAT
passe du vert au clignotant jaune, puis au jaune quand il est éteint.
Vous ne pouvez pas allumer l’appareil tant que l’indicateur d’ETAT
clignote jaune. Attendez que l’indicateur soit jaune permanent.
ATTENTION ! Le branchement des appareils sources à un projecteur
sous tension peut causer des dommages. Il est recommandé de faire en
sorte que le connecteur du cordon d’alimentation (côté projecteur) ou la
prise de courant soit accessible pendant l’utilisation du produit de sorte
à pouvoir débrancher ou mettre hors tension celui-ci avant de raccorder
les appareils sources. Il conviendra de prévoir cette disposition dès
l’installation du produit.