


Dual Trunk E1 Router
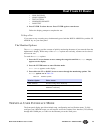
Dual Trunk E1 Router User’s Guide TECHNICAL: 0118 96 56 000 19
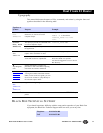
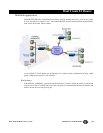
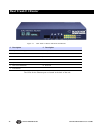
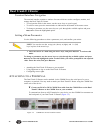
Figure 2-1 Back Panel View–Ports and Ground Stud
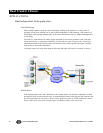
Installation Using DC Power
You need a tray cable that is UL recognized 14 AWG, 3 conductors, copper strand wire, electrical
power and control cable, type TC: tray cable, 600 V 90°C. Alpha Wire Company No. 45443 is an
example.
To connect the Dual Trunk E1 Router to DC power:
1. Place the unit on a flat surface or tray.
2. Make sure the DC power source is off.
3. Before you connect the unit to the centralized DC power source, strip 2 inches of jacket
material off the tray cable and 1/2 inch of insulation off each wire.
4. Connect the -48 V wire to the positive (+) terminal using a small flat screwdriver to
fasten the wire.
5. Connect the ground wire to the negative (-) terminal using the same method.
The unit is designed to operate with negative voltage; therefore, the positive terminal is
connected to ground.
6. Connect a properly grounded third wire to the ground stud near the terminal block
using a 1/4 inch wrench and fastening torque of 5 inch-pounds.
7. To minimize disturbance to the wires through casual contact, secure the tray cable near
the rack frame using multiple cable ties.
Use at least four cable ties, a minimum of 4 inches apart. The first tie should be within 6
inches of the terminal block.
8. Connect the Dual Trunk E1 Router to a DC power source. Turn on power source.
The LEDs on the front panel flash and status messages appear on the alphanumeric display as the
Dual Trunk E1 Router runs the Self Test at power up.
Ground Stud
Reserved
Reserved
COMM Port
Ethernet Port
Network Port
AC Power Connector
Network BNC
(AUX)
Network Port
AUX BNC
DC Power Connector
(DTE 1)
(DTE 2)