


6 - 5
SETUP SEND
Instead of using one of the comments
above, you can enter up to two customized
messages, each 27 characters long. Use the
chart on page 4-2 to help enter characters.
(See Composing Your Own Comments.)
Most of the SETUP SEND functions are temporary settings that allow you to
make adjustments for each document you send. However, so you can set up your
cover page and cover page comments in advance, the Cover Page Setup and
Cover Page Message functions change the default settings.
Composing Your Own Comments
You can set up two custom comments.
1
For the FAX, press Function, 3, 2.
For the MFC, press Function, 1, 3, 2.
2
Press or to choose position 5 or 6 for your customized comment and press
Set.
3
Use the dial pad to enter your customized comment and press Set.
(See
Entering Text, page 4-2.)
4
Press 1 if you want to select additional settings. The LCD returns to the SETUP
SEND menu—OR—Press 2 to exit.
Cover Page for Next Fax Only
Make sure the Station ID is set up. This feature does not work without the
Station ID. (See
Setting Station ID, page 4-1.)
You can set the fax to send a cover page with a particular document. This cover
page will include the number of pages in your document.
1
Place the original in the ADF.
2
For the FAX, press Function, 3, 1.
For the MFC, press Function, 1, 3, 1.
3
When the screen displays NEXT FAX ONLY?, press Set.
4
Press or to select ON (or OFF) and press Set.
5
Press or to select one of the standard or custom comments and press Set.
6
Enter two digits to indicate the number of pages you are sending and press Set.
(Enter 0 0 to leave the number of pages blank.) If you make a mistake, press
to back up and reenter the number of pages.
7
Press 1 if you want to select additional settings. The LCD returns to the SETUP
SEND menu—OR—Press 2 if you are finished choosing settings, and go to
Step 8.
8
Enter the fax number you’re calling.
9
Press Start.
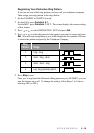
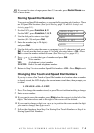
5.(USER DEFINED)
6.(USER DEFINED)
2.COVERPAGE MSG
1.COVERPG SETUP