


1-12
Before Using the Machine
Specify the display format of the date and time and set the
current date and time.
The speci ed date and time are used as the standard time for
functions that require it.
OK
Men
u
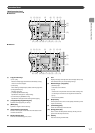
Keys to be used for this operation
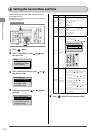
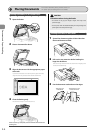
1
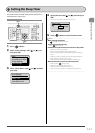
Press [ ] (Menu).
2
Select <Timer Settings> with [ ] or [ ], and
then press [OK].
Menu
Memory Media Settin...
Send/Receive Settin...
Printer Settings
Timer Settings
3
Select <Time & Date Settings> with [ ] or [ ],
and then press [OK].
Timer Settings
Time & Date Settings
Sleep Timer
Auto Reset Timer
Auto Offline Time
4
Select a setting item with [ ] or [ ], and then
press [OK].
Time & Date Settings
Date Display Type
12/24 Hour Clock
Current Time Settings
Daylight Savings
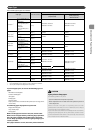
Settings Overview Operation
<Date
Display
Type>
Speci es
the display
format of
date.
Select a display format with [
] or [ ], and then
press [OK].
You can select a display format from the
following three options.
YYYY MM/DD
MM/DD/YYYY
DD/MM YYYY
•
•
•
<12/24
Hour
Clock>
Speci es
the display
format of
time.
Select a display format with [
] or [ ], and then
press [OK].
You can select a display format from the
following two options.
12 Hour (AM/PM)
24 Hour
•
•
<Current
Time
Settings>
Speci es
the current
time and
date.
Use the numeric keys to enter the date and
time, and then press [OK].
Move the cursor with
[ ] or [ ]
.
Switch between <AM> and <PM> with [ ] or [ ].
Current Time Settings
2010 01/01 12:52 AM
<Daylight
Savings>
Speci es
the daylight
saving time.
If you want to use the daylight saving time,
perform the following procedure.
1.
Select <On> with [ ] or [ ], and then press [OK].
2. Specify the starting date of the daylight
saving time.
- Select <Month> with [
] or [ ], and then
press [OK].
-
Select the starting month, and then press [OK].
- Select <Day> with [ ] or [ ], and then
press [OK].
-
Select the starting week, and then press [OK].
- Select the starting day, and then press [OK].
- Select <Apply> with [
] or [ ], and then
press [OK].
3. Specify the ending date of the daylight
saving time in the same way as you speci ed
the starting date.
5
Press [ ] (Menu) to close the menu screen.
Setting the Current Date and Time