


Connecting the Scanner to a Computer
Connect the CR-180II to a computer as follows. Be sure to install the software before
connecting the scanner to a computer.
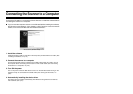
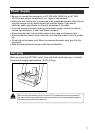
● If you connect the computer and turn on the CR-180II before installing the software,
the following wizard appears. If this happens, click [Cancel] to close the wizard’s
window, turn off the CR-180II and then install the software.
1. Install the software
Install the Scanning Utility for CR-180II in the setup disc provided with the CR-180II. (See
“Installing the Software,” on p.19.)
2. Connect the scanner to a computer
Connect the CR-180II and the computer with a USB or SCSI cable. You need to turn off
the computer before connecting the CR-180II to it with a SCSI cable. (See “Connecting
the Scanner to a Computer,” on p.23.)
3. Turn ON the power
Turn on the power of the CR-180II. Be sure to turn on the CR-180II before turning on the
computer if they are connected with a SCSI cable. (See “Turning ON the Power,” on
p.26.)
4. Automatically installing the device driver
The device driver is installed automatically when Windows recognizes the CR-180II as
new hardware. (See p.27.)
Wizard Screen (Windows 2000)