


Do not see the light source directly while scanning is in progress.
9.
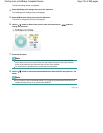
Use the button to select the photo to print, then press the
OK
button.
Note
If
appears on the preview screen, the photos may be not scanned properly. Press the
Back
button, then repeat the procedure from step 8.
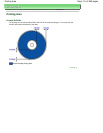
10.
Confirm the print image on the DVD/CD, then press the
OK
button.
Note
Other options
"Printing a Specified Area (Trimming)" in
Using Useful Display Functions
11.
Check the print settings, then press the
OK
button.
The message for preparation is displayed.
Note
Press the
Black
button for black & white copying.
To change print settings, press the
Back
button repeatedly until the screen for the setting item
to change is displayed, then change the setting.
12.
Set the printable DVD/CD.
Press the left Function button to see how to set the printable DVD/CD.
13.
Press the
Color
button.
Note
If you press the
Black button in step 11, black & white copying will start even if you press the
Color
button.
To cancel copying, press the
Stop
button.
After printing, allow the printing surface of the disc to dry naturally. Do not use hairdryers or
expose the disc to direct sunlight to dry the ink. Do not touch the printing surface until the ink
has dried.
To keep the print quality at an optimal level, it is recommended to stop printing discs once
every ten discs when printing more than ten discs continuously.
To stop the printing operation, detach the CD-R Tray from the machine, then close the Inner
Cover. After approximately three minutes have elapsed, open the Inner Cover, attach the CD-R
Tray to the machine, then resume printing.
Page top
Page 707 of 988 pagesPrinting from Film (MP990 series)