


20050501
16-1-2
Data Communication Overview
k Connecting a ClassPad to a Computer
You can perform the following operations when connected to a computer.
• Transfer variable data and eActivity data between the ClassPad and a computer
• Install add-in applications, language data, and operating system upgrades onto your
ClassPad from the computer
• Transfer ClassPad display image data to the computer
• For information about variables, see “1-7 Variables and Folders”.
• For information about eActivity data, see “Chapter 10 – Using the eActivity Application”.
• For information about display image data, see “Sending a Screenshot of the Current
Display Contents” on page 16-4-5.
•See the ClassPad Manager User’s Guide for details about add-in application installation
and uninstallation, language data installation, and upgrading your operating system.
•Your ClassPad may operate abnormally after you update its operating system from your
computer using ClassPad Manager if the operating system you install is not compatible
with your ClassPad hardware version. If you accidentally install an operation system
version that is not compatible with your ClassPad hardware version, visit the following
Website information about what you need to do to get your ClassPad working normally
again.
http://classpad.net/
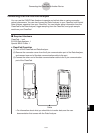
u Connection
Use the special USB cable to connect the ClassPad’s 4-pin mini USB port to your
computer’s USB port. For details, see “Connecting to a Computer (USB)” on page 16-2-3.
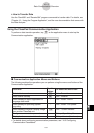
u How to Transfer Data
On the ClassPad, use the Communication application. On your computer, use ClassPad
Manager. For details, see the ClassPad Manager User's Guide.
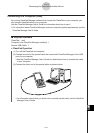
k Connecting a ClassPad to a CASIO EA-200 Data Analyzer
You can perform the following operations when connected to a Data Analyzer.
• Transfer Data Analyzer setup information and sampled data to the ClassPad
• Transfer variable data, eActivity data, and Data Analyzer setting information from the
ClassPad to the Data Analyzer
• For information about variables, see “1-7 Variables and Folders”.
• For information about eActivity data, see “Chapter 10 – Using the eActivity Application”.
• For information about Data Analyzer setup information and sample data, see the user
documentation that comes with the Data Analyzer.
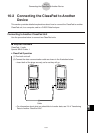
u Connection
Use the special SB-62 3-pin data communication cable to connect two units. For details, see
“Connecting to an EA-200 Data Analyzer” on page 16-2-2.