Chapter 4 Installing Hardware Options
Working with Hard Disk Drives
4-10
Cisco Wide Area Application Engine 512 and 612 Hardware Installation Guide
OL-9137-02
• All hard disk drives being used in the WAE should have the same throughput
speed rating. Mixing hard disk drives with different speed ratings will cause
all hard disk drives to operate at the lower throughput speed.
Caution To maintain proper system cooling, do not operate the device for more than 10
minutes without either a hard disk drive or a filler panel installed in each bay.
Installing SATA Hard Disk Drives
Note The WAE-512 supports simple-swap SATA hard disk drives. Simple-swap hard
disk drives are not hot-swappable. Disconnect all power from the server before
removing or installing a simple-swap hard disk drive.
Note The WAE-612 hardware supports hot-swappable SATA hard disk drives; however,
you must be running WAAS 4.0.13 or a later version to obtain the software
support for hot-swapping. If you are running a WAAS version prior to 4.0.13, we
recommend that you power down your WAE-612 when swapping or installing
new hard disk drives.
To install an SATA hard disk drive in a bay, follow these steps:
Step 1 Inspect the new drive for any signs of damage.
Step 2 Review the information in the “Safety Warnings” section on page 2-1, and the
“Safety Guidelines” section on page 2-4.
Step 3 Make sure that the chassis cover is in place and fully closed.
Step 4 Power down the device and peripheral devices, and disconnect the power cord and
all external cables.
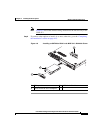
Step 5 If the drive bay contains a filler panel, remove it.
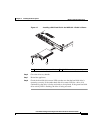
Step 6 To install the hard disk drive, pull the loops of the drive tray toward each other
and slide the drive into the bay until the drive connects to the backplane.
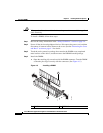
Step 7 Insert the filler panel into the bay to cover the drive. (See Figure 4-6.)


