


Replacing the Wireless Mini-Card(s) | 41
16
Replacing the Wireless Mini-Card(s)
WARNING:
Before working inside your computer, read the safety information that
shipped with your computer and follow the steps in "Before You Begin" on page 9.
For additional safety best practices information, see the Regulatory Compliance
Homepage at dell.com/regulatory_compliance.
NOTE: Dell does not guarantee compatibility or provide support for Mini-Cards
from sources other than Dell.
Your computer supports connectors for the following Mini-Cards:
• One half Mini-Card — Wireless Local Area Network (WLAN) + Bluetooth combo
card, Wi-Fi, and Worldwide Interoperability for Microwave Access (WiMax)
• One full Mini-Card — WWAN or mSATA card
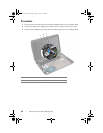
Procedure
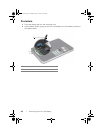
1 Remove the new Mini-Card(s) from its packaging.
2 Align the notch on the Mini-Card(s) with the tab on the system-board connector.
CAUTION: Use firm and even pressure to slide the Mini-Card into place.
If you use excessive force, you may damage the connector.
CAUTION: The connectors are keyed to ensure correct insertion.
If you feel resistance, check the connectors on the Mini-Card and on the
system board, and realign the Mini-Card.
CAUTION: To avoid damage to the Mini-Card, never place cables under the
Mini-Card.
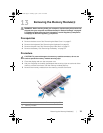
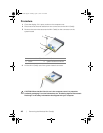
3 Insert the Mini-Card(s) connector at a 45-degree angle into the
system-board connector.
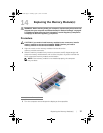
4 Press the other end of the Mini-Card(s) down into the slot on the system board and
replace the screw that secures the Mini-Card(s) to the system-board connector.
book.book Page 41 Tuesday, April 17, 2012 11:08 AM