


Removing the Processor Heat-Sink | 81
33
Removing the Processor Heat-Sink
WARNING:
Before working inside your computer, read the safety information that
shipped with your computer and follow the steps in "Before You Begin" on page 9.
For additional safety best practices information, see the Regulatory Compliance
Homepage at dell.com/regulatory_compliance.
Prerequisites
1 Remove the base cover. See "Removing the Base Cover" on page 17.
2 Remove the keyboard. See "Removing the Keyboard" on page 21.
3 Remove the palm rest. See "Removing the Palm Rest" on page 27.
4 Remove the battery. See "Removing the Battery" on page 31.
5 Remove the memory module(s). See "Removing the Memory Module(s)" on
page 35.
6 Remove the wireless Mini-Card(s). See "Removing the Wireless Mini-Card(s)" on
page 39.
7 Follow the instructions from step 1 to step 3 in "Removing the Hard Drive" on
page 51.
8 Remove the fan. See "Removing the Fan" on page 63.
9 Follow the instructions from step 1 to step 3 in "Removing the System Board" on
page 75.
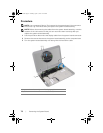
Procedure
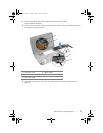
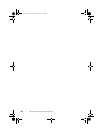
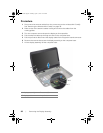
1 In sequential order (indicated on the heat sink), loosen the captive screws that
secure the processor heat-sink to the system board.
2 Lift the processor heat-sink off the system board.
1 captive screws (4) 2 processor heat-sink
1
2
book.book Page 81 Tuesday, April 17, 2012 11:08 AM