


72 Installing System Components
5
If the heat sink has not separated from the processor, carefully rotate the heat sink in a clockwise, then
counterclockwise, direction until it releases from the processor. Do not pry the heat sink off of the
processor.
6
Lift the heat sink off of the processor and set the heat sink aside.
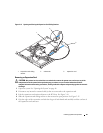
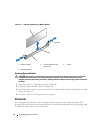
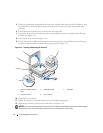
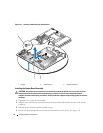
7
Press down on the processor socket release lever, then pull the release lever upward to the fully open
position. See Figure 3-19.
8
Open the processor cover. See Figure 3-19.
9
Lift the processor vertically out of the socket. Leave the processor cover and release lever in the open
position so that the socket is ready for the new processor. See Figure 3-19.
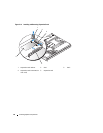
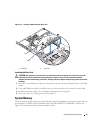
Figure 3-19. Installing and Removing the Processor
10
Unpack the new processor.
11
Ensure that the processor socket release lever is in the fully open position.
12
Align the pin 1 corners of the processor and socket. See Figure 3-19.
NOTICE: You must position the processor correctly in the socket to avoid damaging the processor and the system
board when you turn on the system. Be careful not to touch or bend the pins on the socket.
1 processor socket release
lever
2 processor socket 3 processor
4 processor cover 5 pin-1 locators
5
4
2
1
3