


Removing and Installing Parts 161
4
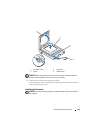
Replace the processor and the heat sink (see "Installing the Processor" on
page 153).
NOTICE: Ensure that the processor fan/heat sink assembly is correctly seated and
secure.
5
Replace the memory modules into the memory sockets at the same
locations from which you removed them (see "Memory purchased from
Dell is covered under your computer warranty." on page 112).
6
Replace any add-in cards on the system board.
7
Replace the computer cover (see "Replacing the Computer Cover" on
page 162).
8
Connect your computer and devices to an electrical outlet, and turn
them on.
9
Verify that the computer works correctly by running the Dell Diagnostics
(see "Dell Diagnostics" on page 84).
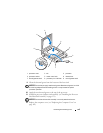
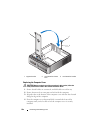
Replacing the Support Bracket
CAUTION: Before you begin any of the procedures in this section, follow the
safety instructions located in the Product Information Guide.
To replace the support bracket:
1
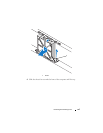
Align and insert the hinges at the bottom of the support bracket into the
hinge tabs located along the edge of the computer.
2
Pivot the support bracket downward.
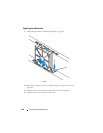
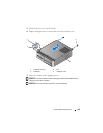
3
Align the notch in the support bracket with the slot in the hard drive bay
and press it down.
4
Ensure that the support bracket is seated correctly and replace the card
retention bracket.