


Removing and Installing Parts: Dell Dimension E520 Service Manual
file:///T|/htdocs/systems/dimE520/en/SM_EN/parts.htm[10/16/2012 1:05:24 PM]
Back to Contents Page
Removing and Installing Parts
Dell™ Dimension™ E520 Service Manual
Removing the Computer Cover
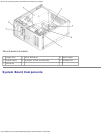
Inside View of Your Computer
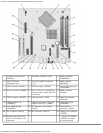
System Board Components
Memory
Cards
Drive Panel
Drives
Hard Drive
Floppy Drive
Media Card Reader
CD/DVD Drive
Battery
Power Supply
Processor
I/O Panel
Processor Fan
System Board
Replacing the Computer Cover
This chapter provides procedures for removing and installing the components in your computer. Unless otherwise noted, each
procedure assumes that the following conditions exist:
You have performed the steps in Turning Off Your Computer and Before Working Inside Your Computer.
You have read the safety information in your Dell™ Product Information Guide.
A component can be installed by performing the removal procedure in reverse order.
You have the tools listed in Recommended Tools.
Removing the Computer Cover
CAUTION: Before you begin any of the procedures in this section, follow the safety instructions in the
Product Information Guide.
CAUTION: To guard against electrical shock, always unplug your computer from the electrical outlet before
removing the cover.
CAUTION: When working inside the computer, be aware that the heat sink assembly, power supply, and
other components may be very hot during normal operation. Be sure that components have had sufficient
time to cool before you touch them.
1. Follow the procedures in Before You Begin
.
NOTICE: Ensure that sufficient space exists to support the removed cover—at least 30 cm (1 ft) of desk top space.
NOTICE: Ensure that you are working on a level, protected surface to avoid scratching either the computer or the
surface on which it is resting.
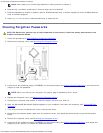
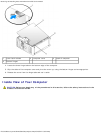
2. Lay your computer on its side with the computer cover facing up.
3. Pull back the cover release latch located on the top panel.