


Removing and Installing Parts: Dell Dimension E520 Service Manual
file:///T|/htdocs/systems/dimE520/en/SM_EN/parts.htm[10/16/2012 1:05:24 PM]
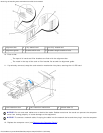
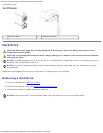
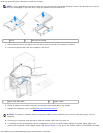
NOTE: If your replacement hard drive does not have the hard drive bracket attached, remove the bracket from the old
drive by unsnapping it from the drive. Snap the bracket onto the new drive.
1 drive 2 hard-drive bracket
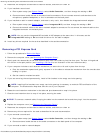
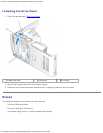
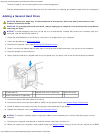
4. Gently slide the drive into place until you feel a click or feel the drive securely installed.
5. Connect the power and hard-drive cables to the drive.
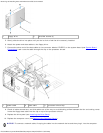
1 serial ATA data cable 2 power cable
6. Check all cables to be certain that they are properly connected and firmly seated.
7. Replace the computer cover (see Replacing the Computer Cover).
NOTICE: To connect a network cable, first plug the cable into the network port or device and then plug it into the
computer.
8. Connect your computer and devices to electrical outlets, and then turn them on.
9. If installing this drive changes the drive configuration, be sure to reflect these changes in system setup. When you
restart your computer, enter system setup (see System Setup ), then go to the "Drives" section of the BIOS and under