


Removing and Installing Parts: Dell Dimension E520 Service Manual
file:///T|/htdocs/systems/dimE520/en/SM_EN/parts.htm[10/16/2012 1:05:24 PM]
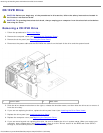
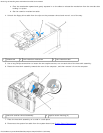
9. Ensure that all cables have been removed from the routing clips on the top of the system fan assembly.
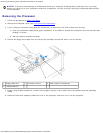
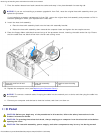
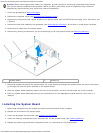
1 fan release lever 2 fan release lever tab 3 processor fan
10. The fan has two release levers. One on the side facing the hard disk and a smaller one on the opposite side next to the
bottom cover. Release both fan levers, then slide the fan toward the back of the computer to release the four fan tabs
from the four slots in the bottom cover.
11. Remove the fan from the computer.
Installing the Processor Fan
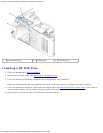
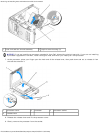
When reinstalling the fan, ensure that you do not pinch the wires that run between the system board and the fan.
NOTICE: Ensure that the four fan tabs are fully inserted into the four keyhole slots in the bottom cover so that the fan
can slide back fully into position. Ensure that the fan release lever tabs are seated into their respective slots.
Follow the fan removal procedure (Removing the Processor Fan
) in reverse order.
System Board
Removing the System Board
CAUTION: To guard against electrical shock, always unplug your computer from the electrical outlet before
opening the cover.
CAUTION: The heat sink assembly, power supply, and other components may be very hot during normal
operation. Be sure that they have had sufficient time to cool before you touch them.