


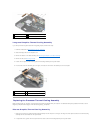


Integrated Graphics Thermal-Cooling Assembly
If you have purchased a system board with integrated graphics, follow these steps:
1. Follow the instructions in Before Working on Your Computer.
2. Close the display and turn the computer over.
3. Remove the bottom of the base assembly (see Removing the Bottom of the Base Assembly).
4. Remove the fan (see Removing the Fan).
5. Loosen the four captive screws securing the thermal-cooling assembly to the system board.
6. Lift the screw-end of the assembly up at an angle, then ease the vent-end of the assembly out of the computer.
Replacing the Processor Thermal-Cooling Assembly
Before working inside your computer, read the safety information that shipped with your computer. For additional safety best practices information, see the
Regulatory Compliance Homepage at: www.dell.com/regulatory_compliance.
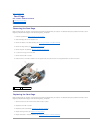
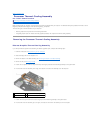
Discrete Graphics Thermal-Cooling Assembly
1. Place the vent-end of the graphics thermal-cooling assembly into the computer at an angle, then align the three captive screws on the thermal-cooling
assembly with the screw holes on the system board.
2. In sequential order, tighten the three captive screws to secure the thermal-cooling assembly to the system board.
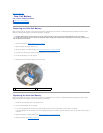
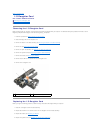
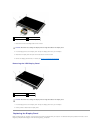
1
vent-end of assembly
2
processor thermal-cooling assembly
3
screw-end of assembly
4
captive screws (4)
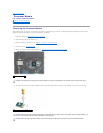
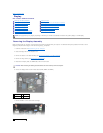
1
vent-end of assembly
2
processor thermal-cooling assembly
3
captive screws (4)
4
screw-end of assembly