


Installing System Components 97
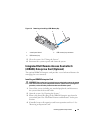
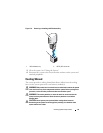
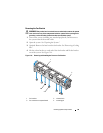
Installing the Cooling Shroud
1
Align the tabs on the right side of the cooling shroud with the cutouts in
the right chassis wall.
2
Lower the right end of the shroud into the chassis cutouts and rotate the
left end down inside the left chassis wall.
3
Close the system. See "Closing the System."
4
Reconnect the system to the electrical outlet and turn on the system and
attached peripherals.
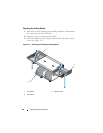
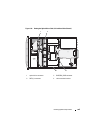
Cooling Fans
The system has either five or four hot-swappable fans to provide cooling to
the system’s interior components.
• Dual-processor configurations have five fans.
• Single-processor configurations have four fans (fans 1 through 4) and a
blank inserted in the fan 5 bay. Fan 5 can be installed as an optional fan.
NOTE: In the event of a problem with a particular fan, the fan’s number is
referenced by the system’s management software, allowing you to easily identify
and replace the proper fan.
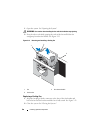
Removing a Cooling Fan
WARNING: Only trained service technicians are authorized to remove the system
cover and access any of the components inside the system. Before you begin this
procedure, review the safety instructions that came with the system.
CAUTION: The cooling fans are hot-swappable. To maintain proper cooling while
the system is on, replace only one fan at a time.
CAUTION: On single-processor systems using four fans, the fan blank must be
installed in the FAN5 bay to maintain proper cooling while the system is on.
NOTE: If a fan is installed in FAN5 in a single-processor configuration, the fan will
still be operational, however the fan will not appear in the iDRAC user interface
unless the fan was installed before the system was started.