


e
Electro Industries/GaugeTech
Doc # E107706 V1.25 2-5
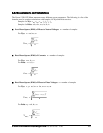
2. If you are going to use DHCP, click the Advanced Settings Button:
Click the tab at the top of the DHCP screen. Click Enable.
DHCP will automatically enter the IP Address and some or all of the Interface Settings.
Click OK at the bottom of the screen to return to the Device Profile: Communication Ports
screen. You may have to manually enter DNS, Email, Gateway Setting and/or a Unique
Computer Name. Click OK.
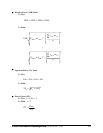
3. If you are NOT using DHCP, in the Network Settings section, enter data provided by your
systems manager:
IP Address: 10.0.0.1 (Example)
Subnet Mask: 255.255.255.0 (Example)
Default Gateway: 0.0.0.0 (Example)
Computer Name: NETWORK (Example)
Q
Enter the Domain Name Server and Computer Name.
Q
Customize Web Content, if desired. Default Pages with an extensive array of readings comes with
the meter. The content of the pages can be customized using FTP Client.
From the Device Profile: Communications Ports screen, click Advanced Settings. Click the FTP
Client tab on the top of the folder. Using FTP, you can easily replace any file by using the
SAME FILE NAME as the one you want to replace.
Q
Enter the Email Server IP Address. The Default Settings store ONE Email Server IP Address for
administrative purposes or to send an alarm, if there is a problem. An ADDITIONAL 8 can be con-
figured with FTP Client.
Q
Update FIRMWARE, if needed, with TFTP protocol (see Appendix C).
Q
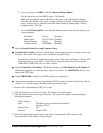
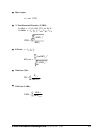
After the above parameters are set, Communicator EXT will connect via the network using a Device
Address of “1” and the assigned IP Address using the following steps:
1. Double click on Communicator EXT icon to open.
2. Click the Connect icon in the icon tool bar. The Connect screen will appear.
3. Click the Network button at the top of the screen. The screen will change to one requesting the
following information:
Device Address: 1
Host: IP Address (per your network administrator).
Example: 10.0.0.1
Network Port: 502
Protocol: Modbus TCP
4. Click the Connect button at the bottom of the screen. Communicator EXT connects to the
Nexus with the Host IP Address via the Network.