


Installation of the RTM-ATCA-7150
ATCA-7150 and RTM-ATCA-7150 Getting Started (6806800G42B)
53
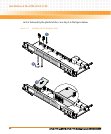
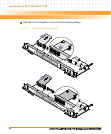
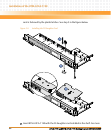
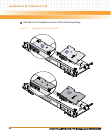
7. Insert the GE daughter card in RTM-ATCA-7150 by facing the daughter card at an
angle of 45° to the RTM. Align the daughter card connector with the connector on
RTM-ATCA-7150, and the daughter card positioning holes with the plastic supports
on RTM-ATCA-7150. Exert even power downwards until the daughter card
connector is fully inserted into the connector on RTM-ATCA-7150 and the daughter
card is fastened by the plastic latches. See step 3 in the figure above.
8. Install RTM-ATCA-7150 whose GE daughter card is replaced. For more information
refer, Installing RTM-ATCA-7150.
After replacement, check if RTM-ATCA-7150 can be powered on and work normally. Use the
network cable to connect RTM-ATCA-7150 to the external network. Check if the network is
connected properly and monitor whether the network port indicator is normal.
2.6.4 FC Daughter Card
This manual considers the FC daughter card providing two external FC interfaces as an
example, and describes how to install the daughter card on and remove it from RTM-ATCA-
7150.
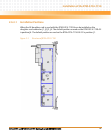
2.6.4.1 Installation Positions
When the FC daughter card is used with the RTM-ATCA-7150 it can be installed on the
daughter card connector J2, J4. The default position as used on the RTM-ATCA-7150-GE-FC is
position J4 and J1.
2.6.4.2 Installing the FC Daughter Card
To install the FC daughter card, proceed as follows.
1. Wear the ESD-preventive wrist strap. For more information refer, Wearing the ESD-
Preventive Wrist Strap.
2. Lay RTM-ATCA-7150 where the FC daughter card is to be installed on the antistatic
desktop.