


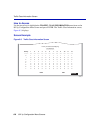

Traffic Class Information Screen
802.1p Configuration Menu Screens 8-7
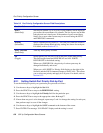
8.2.2 Setting Switch Port Priority on All Ports
To set the port priority on all ports simultaneously, proceed as follows:
1. Use the arrow keys to highlight the Set field.
2. Press the SPACE bar to step to the ALL PORTS setting. A Priority field displays to the right of
the Set field.
3. Use the arrow keys to highlight the Priority field.
4. Press the SPACE bar to select a priority from 0 through 7 (0 is the lowest priority).
5. Use the arrow keys to highlight the SAVE ALL command at the bottom of the screen.
6. Press ENTER. The message “SAVED OK” displays and all ports are set to the priority selected
in step 4 and saved.
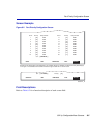
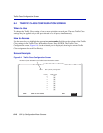
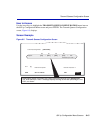
8.3 TRAFFIC CLASS INFORMATION SCREEN
When to Use
To view the current mapping of the Traffic Class-to-priority for each port, which can include both
physical and virtual ports. If the number of ports exceeds 12 ports, then other ports can be
displayed using the NEXT command.
With this screen, you can also select a port and access the Traffic Class Configuration screen,
which allows you to change the Traffic Class (0 -3, with 0 being the lowest level) for each priority
of the selected port. Then you can apply the new settings to either the selected port or to all the
ports.
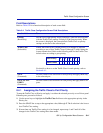
Priority-to-Traffic Class Mapping is used to assign 802.1p priority values to a Traffic Class
(0 through 3 with 0 being the lowest level Traffic Class) for each frame priority.
For example, if the Traffic Class is set to 3 for those frames with a priority 7, then those frames
would be transmitted before any frames contained in Traffic Classes 2 through 0.
NOTE: The priority is only changed while the SmartSwitch device is processing the
frame. Frames received by the SmartSwitch device with a 1p priority value are
transmitted with that same value.