


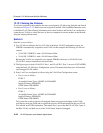

Quick VLAN Walkthrough
12-20 VLAN Operation and Network Applications
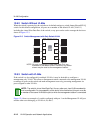
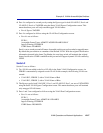
7. Leave the GVRP STATUS field for Port 3 in the default setting of ENABLED. This sets
Port 10 as a GVRP port to receive registrations of dynamically created VLANs.
8. Leave the PVID field for Port 10 set in the default setting of 1.
9. Use the arrow keys to highlight the Acceptable Frame Types field for Port 10.
10.Use the SPACE bar to step to ADMIT VLAN TAGGED ONLY. This causes Port 10 to drop
all frames received that are untagged.
11.Leave the INGRESS FILTERING field for Port 3 in the default setting of DISABLED.
12.Leave the GVRP STATUS field for Port 3 in the default setting of ENABLED. This sets
Port 10 as a GVRP port to pass tagged frames of dynamically created VLANs.
13.Use the arrow keys to highlight the SAVE command at the bottom of the screen. Press ENTER.
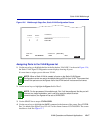
The screen should now look like Figure 12-9.
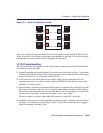
Figure 12-9 Walkthrough Stage Four, VLAN Port Configuration
NOTE: Since Port 10 will be used for switch-to-switch communications, the PVID is left
set on the default VLAN value of 1. This associates Port 10 with all VLANs on the
switch. Since Port 10 will be used as a trunk port, only tagged frames will be allowed
through the port.
30691_66
RETURN
EXITNEXT
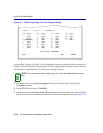
Port
1
2
3
4
5
6
7
8
9
10
11
12
PVID
1
1
2
1
1
1
1
1
1
1
1
1
Acceptable Frame Types
[ ADMIT ALL FRAMES ]
[ ADMIT ALL FRAMES ]
[ ADMIT ALL FRAMES ]
[ ADMIT ALL FRAMES ]
[ ADMIT ALL FRAMES ]
[ ADMIT ALL FRAMES ]
[ ADMIT ALL FRAMES ]
[ ADMIT ALL FRAMES ]
[ ADMIT ALL FRAMES ]
[ ADMIT VLAN TAGGED ONLY ]
[ ADMIT ALL FRAMES ]
[ ADMIT ALL FRAMES ]
Ingress Filtering
[ DISABLED ]
[ DISABLED ]
[ DISABLED ]
[ DISABLED ]
[ DISABLED ]
[ DISABLED ]
[ DISABLED ]
[ DISABLED ]
[ DISABLED ]
[ DISABLED ]
[ DISABLED ]
[ DISABLED ]
SAVE
GVRP Status
[ ENABLED ]
[ ENABLED ]
[ ENABLED ]
[ ENABLED ]
[ ENABLED ]
[ ENABLED ]
[ ENABLED ]
[ ENABLED ]
[ ENABLED ]
[ ENABLED ]
[ ENABLED ]
[ ENABLED ]