


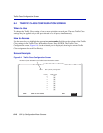

Priority Classification Configuration Screen
8-18 802.1p Configuration Menu Screens
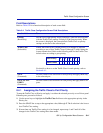
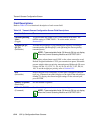
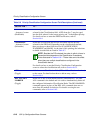
PID
– bottom of screen
(Modifiable)
Enter the priority value that will be associated with the classification
selected in the Classification field. A PID from 0 to 7 may be typed
into the field, where 0 is the lowest priority and 7 is the highest priority.
For details on how to enter the PID/Classification, refer to
Section 8.6.4.
Classification
– bottom of screen
(Selectable)
Select the classification that will be associated with the priority
selected in the PID field. Depending on the classification selected,
there can be up to three fields involved (CLASSIFICATION,
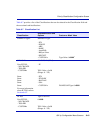
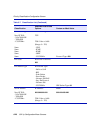
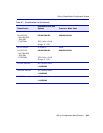
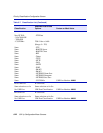
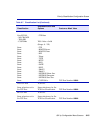
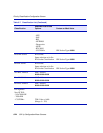
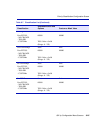
IP ADDRESS, and MASK). At the time of this printing, the selections
available in each field are listed in Table 8-7.
NOTE: Besides the PID selected, the order in which a frame is
transmitted also depends on the Classification Precedence
Rules discussed in Section 8.6.1. These rules come into effect
when there are multiple classifications configured in the
SmartSwitch device.
For details on how to use the Priority Classification Configuration
screen to select the classification rule, refer to Section 8.6.4.
ADD
(Toggle)
Add the current Classification Rule (PID and Classification selections)
to the screen. For details about how to add an entry, refer to
Section 8.6.4.
DEL ALL/DEL
MARKED
(Toggle)
Delete all or one or more marked entries, simultaneously. The DEL
ALL command is the default and it is used to simultaneously delete all
the configured information Classification Rules. The DEL MARKED
command appears in place of the DEL ALL command when one or
more lines are marked for deletion. For details on using the two
commands, refer to Section 8.6.5.
Table 8-6 Priority Classification Configuration Screen Field Descriptions (Continued)
Use this field … To…