


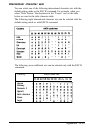

I
lnitialization, A-12
Input buffer, A-2
Interface
connecting, 1-17—19
specifications, A-9—11
L
labels, 2-17—18, A-5
Lever
paper-release, 2-6, 2-7, 2-12, 2-13, 2-14
paper-thickness, 2-15, 2-16, 2-17, 2-18
Loading paper
continuous paper, 2-7—10
envelopes, 2-16
labels, 2-17—18
manually,
2-4—5
multi-part
forms, 2-17
single sheets, 1-14-16
LQ printing,
A-2
M
Maintenance, 3-14—15
Manual insertion, 2-4—5
Moving the printer, 3-16
Multi-part forms, 2-17, A-4
R
READY light, 3-2—3
Ribbon cartridge
installing, 1-5—7
installing black ribbon, 1-5—7
installing color ribbon, 1-11—12
replacing, 3-15
specifications, A-7
O
Optional push tractor, 2-5—14
output guide, 1-12
S
Safety approvals, A-9
Safety information for UK users, i-5
Safety instructions, i-6
Scalable fonts, 3-5, A-16
Self test, 1-14—17, 3-4
Single sheets, 2-2—5
see also Loading paper
Skip-over-perforation, 3-6, 3-9, 3-12
Special paper, 2-15—18
Specifications, A-2—12
Stand, printer, 1-4
Switching between continuous and
single sheet, 2-13—14
P
P&length
continuous paper, 3-6, 3-9—10, A-7
manual insertion, A-4
single sheets, A-4
Paper
continuous, A-4
singlesheet, A4
Paper cassette, 1-3, 1-14—16
tips for using, 2-2—3
Paper guide, 2-5, 2-12
Paper support 1-15
Paper-release lever, 2-6, 2-12, 2-13, 2-14
Paper-thickness lever, 2-15
Parallel interface, 1-17—19, A-9—11
Plugging in the printer, 1-13
Print direction, 3-6, 3-9, 3-13, A-2
Printable area, A-6—7
Printer stand, 1-4
Problems, see Troubleshooting
Protective materials
replacing, 3-16
Push tractor, 2-5—14
installing, 2-5—6
loading paper, 2-7—9
T
Tear off, 2-10—11, 3-6, 3-9, 3-12
adjusting, 2-2—3
position, 3-6, 3-9, 3-12
Testing the printer, 1-14—17
IN-2