


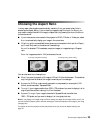

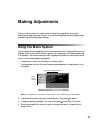
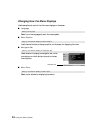

Adjusting the Image Quality 31
Sharpness and Picture Quality Settings
If the image looks fuzzy, or if it contains noise or flickering, you can use these settings to
correct it.
■ Sharpness
Use this function to make lines and edges appear more distinct in the image.
■ Progressive
Leave this setting on Film/Auto so the projector automatically senses the type of image
and displays it in the optimal mode. When receiving an interlaced image (in 480i or 575i
format), the projector converts it to progressive. The projector uses DCDi (Directional
Correlational Deinterlacing) for video-sourced images. For film-sourced images, the
projector uses 3-2 pulldown detection and optimizes the image accordingly.
You can adjust the projector’s sensitivity to still or moving images using the Motion
Detection setting, described below.
If you notice the projected image switching between film and video mode, change the
setting to
Video. If you’re viewing still images (such as computer graphics or digital
camera photos) or pausing a video, you may want to switch to
Off to prevent
interlaced-to-progressive (IP) conversion from taking place.
Note: This setting applies only when viewing component video and the input signal is in 480i or
575i format (see page 69).
■ Motion Detection
This setting works with the Progressive setting (described above). If you notice that
moving images seem jittery or halting, or diagonal lines appear jagged, move the slider bar
toward
M (for motion). To increase detail for still images, move the slider bar toward S
(for still).
■ Noise Reduction
Leave this setting off, unless viewing images from a weak signal with a lot of noise. Turn
the setting on and select one of the noise reduction options to suppress interference and
makes images appear softer (available only if the image source is set to Video or S-Video).
Image ! Picture Quality ! Sharpness
Setting ! Advanced ! Progressive
Setting ! Advanced ! Motion Detection
Setting ! Advanced ! Noise Reduction