


44 Setting Up Your Computer
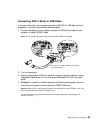
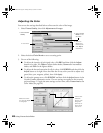
Connecting With a Network Cable
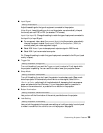
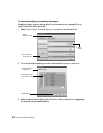
Follow these steps to connect to your projector using a network cable:
1. Connect to the projector using a commercially available 10baseT or 100baseTX network
cable (Category 5 or better).
Note: If you’ll be connecting the cable directly to the computer running Cinema Color Editor,
use a “crossover” network cable. To connect to an access point on the network, such as a hub
or router, use a standard “straight-through” cable.
2. Connect the other end of the cable to your computer or network access point, as desired.
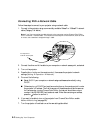
3. Turn on the projector.
4. Press the
Menu button on the remote control, then access the projector’s network
settings (
Setting ! Operation ! Network).
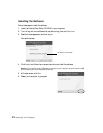
5. Do one of the following:
■ Select DHCP if your computer or network assigns addresses automatically using
DHCP.
■ Otherwise, turn off DHCP and use the arrow buttons on the remote control to enter
the projector’s IP address. The first three parts of the address should be the same as
for the computer running Cinema Color Editor; the last part should be a unique
number. Use 255.255.255.0 as the subnet mask. When done entering an address,
press the button to confirm it.
6. If you want to be able to turn on the projector from Cinema Color Editor, enable
Network Monitoring (see page 38).
7. Turn the projector off and back on so the new settings take effect.
To computer or
network access point