


18 | Chapter 2: Wireless Configuration
Wireless Cable Gateway CG3000D-1CXNAS
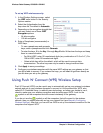
Start Configure Button
This button can be used to start WPS configuration.
Note: The first time you use WPS it will assign a random network name
(SSID) and a random passphrase to your wireless network. If you
want to keep the network name and passphrase you specified in the
Wireless Settings screen, you must select the Keep Wireless
Settings checkbox.
1. Click the Start Configure button.
• The WPS LED on the front of the gateway begins to blink.
• The gateway tries to communicate with the wireless computer or device for 2 minutes.
• If the Security Option in the Wireless Settings screen was set to Disabled, it is
automatically changed to WPA-PSK [TKIP] + WPA2-PSK [AES] including a random
wireless security password.
2. Go to the wireless computer, and run its WPS configuration utility. Follow the utility’s
instructions to click a WPS button.
When the computer connects to the wireless network, the gateway sends its SSID and
WPA-PSK or WPA2-PSK configuration to that computer.
On the computer that just joined the wireless network, make sure you can connect to the Internet.
You should see the gateway’s Internet LED blink, showing that its Internet connection is in use.
Access Control by MAC Address
You can use access control to specify which wireless computers or devices can connect to
the gateway based on their MAC addresses. If you do not set up access control, any wireless
computer or device that is configured with the correct SSID and wireless security settings will
be allowed to access to your wireless network.
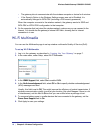
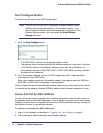
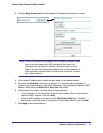
To control access based on MAC addresses:
1. Log in to the gateway as described in “Logging Into Your Gateway” on page 7.
2. In the main menu, under Advanced, select Wireless Settings.