


Page 6-9
640t – Installation and Operating Instructions
After the board has cleared the rollers, release 10.
the foot switch or press STOP.
mo u n t i n g
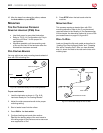
ti p s fo r th r e a d i n g pr e s s u r e
s
e n s i t i v e ad h e s i v e (psa) fi l m
Use Kraft paper for one-sided lamination.•
Refer to “Fig. 6-14. Configurations for Poly-in •
and Poly-out Films.”
for the proper film
configuration.
Whenever possible, pull the remaining web •
of film out the front of the laminator after the
finished item has been removed.
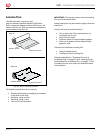
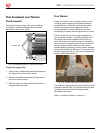
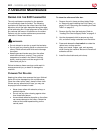
pr e -co a t i n g Bo a r d s
You may wish to pre-coat mounting boards ahead of
time with PSA mounting lm.
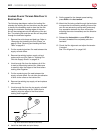
PSA mounting lm
Board
Fig. 6-16. Laminator Ready for Pre-Coating Boards.
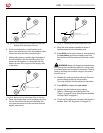
To pre-coat boards:
Load the laminator as shown in “Fig. 6-16. 1.
Laminator Ready for Pre-Coating Boards.”
Adjust the roller pressure handle to the proper 2.
mounting setting.
Start a leader board into the rollers. 3.
Press 4. RUN or the foot switch.
Continue feeding one board after another. 5.
Tip: Butt the leading edge of the next board to
the trailing edge of the previous one to ensure an
even application of film.
Press 6. STOP when the last board exits the
machine.
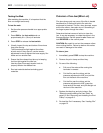
mo u n t i n g on l y
This process requires a decaled item with PSA
mounting adhesive. Refer to the
To run the second
pass instructions
in the
Decaling In Two Passes
section
of this chapter. An alternative method is to use a PSA
pre-treated board on page 6-8, gure 6.15
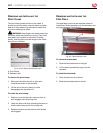
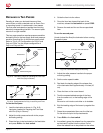
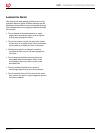
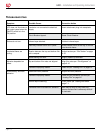
ro l l-t o -ro l l
Load and thread the lm and media as described in
“Loading Film Onto the Supply Shafts”
and
“Threading
Film with a Threading Card”
. After you have nished
step 14, attach the web to the rear rewind tube with
masking tape.
Fig. 6-17. Laminator Ready for Roll-to-Roll.
Release liner
PSA overlam
Adhesive back media
Rear rewind