


Cd 39 Helvetica CondensedHelvetica Chapter 1— Getting Started
EasyCoder 3400e Bar Code Label Printer User’s Manual 3
1 2 3 4 5 6 7 81 2 3 4 5 6 7 8
3XXXU.003
O
I
Media
cover
Fanfold media
access slot
AC power cord
receptacle
Serial communications
port
On/Off
switch
Optional I/O
board port
Darkness adjust
control
DIP switches
Parallel
port
Media
window
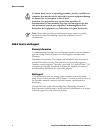
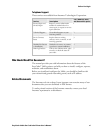
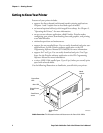
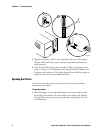
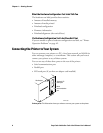
3400e back view: This illustration shows the features on the back of the 3400e.
Several options are available for use with your printer. See Appendix A,
“Specifications,” for complete descriptions of these options.
Preparing the Printer for Installation
Before connecting your printer to your data collection system, you need
to:
• plug in the printer.
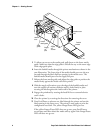
• open the printer and load media.
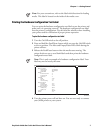
• print a configuration test label.
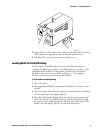
Plugging In the Printer
The back of your printer contains the AC power receptacle, the serial
communications port, the On/Off switch, and two banks of DIP switches.
To plug in the printer
1 Turn the On/Off switch to the off position.
2 Make sure you set the DIP switches to their factory default settings.
Top Bank
Set switch 1 on (I). Set switches 2 through 8 off (O).
Bottom Bank Set switches 1 through 8 off (O).
For a description of the DIP switch settings, see “Configuring the Serial
Port for Communications” on page 12.