Cd 39 Helvetica CondensedHelvetica Chapter 6— Using Test and Service Mode
EasyCoder 3400e Bar Code Label Printer User’s Manual 65
3XXXU.050
OFF
ON
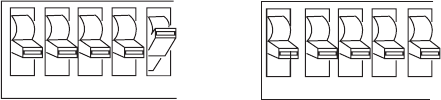
1 2 3 4 5
Top Bank
Switch settings
for moving the
X origin backward
1 2 3 4 5
Switch settings
for moving the
X origin forward
Top Bank
OFF
ON
4 In the bottom bank of the Test and Service DIP switches, turn on or off
the appropriate DIP switches. See the Dot Increments DIP Switch
Settings illustration on page 60 to see how to set the X forms adjust
forward or backward a given number of increments.
5 Press the Feed/Pause button.
The printer prints out the software configuration label using the new X
forms adjust setting.
6 Verify the X forms adjust number on the software configuration label
matches the number you set in Step 4.
Y Forms Adjust
Use the Y Forms Adjust feature to control the position of the image in the
direction parallel to the printhead. See the Dot Increments DIP Switch
Settings illustration on page 60 for information on how to move the image
forward a number of dot increments. If your label is too close to one edge
of the printhead, you can adjust it using this feature.
To set the Y forms adjust
1 Turn the On/Off switch to the off position.
2 Press and hold the Feed/Pause button while turning on the printer.
The printer prints out the hardware configuration label and then enters
Data Line Print mode.
3 In the top bank of the Test and Service DIP switches, turn on switches
1, 2, and 3.
4 In the bottom bank of the Test and Service DIP switches, turn on or off
the appropriate DIP switches. See the Dot Increments DIP Switch
Settings illustration on page 60 to see how to set the X forms adjust
forward or backward a given number of increments.
5 Press the Feed/Pause button. The printer prints out the software
configuration label using the new Y forms adjust setting.
6 Verify the Y forms adjust number on the software configuration label
matches the number you set in Step 4.