Chapter 6— Using Test and Service Mode Cd 39 Helvetica CondensedHelvetica
62 EasyCoder 3400e Bar Code Label Printer User’s Manual
3XXXU.048
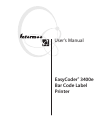
OFF
ON
1 2 3 4
Top Bank
Switch settings
for retracting label
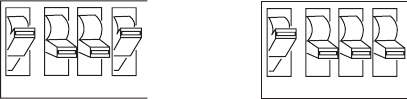
1 2 3 4
Switch settings
for feeding
label forward
Top Bank
OFF
ON
4 In the bottom bank of the Test and Service DIP switches, turn on or off
the appropriate DIP switches. See the Dot Increments DIP Switch
Settings illustration on page 60.
5 Press the Feed/Pause button.
The printer prints the software configuration label and stops at the new
location.
6 Verify that the label rest point number on the software configuration
label matches the number you set in Step 4.
7 Try printing again to see if you need to readjust the DIP switches in the
bottom bank.
8 If you need to readjust the DIP switches in the Bottom Bank, repeat
Steps 4 through 7. If not, exit Test and Service mode by turning off the
printer and returning all DIP switches to their original settings.
9 Turn the On/Off switch to the off position.
Setting Emulation Mode
If you are replacing an Intermec 8636 or 8646 printer with a 3400e
printer, you can keep your existing network, hardware, software, and label
formats by using Emulation mode. The labels produced on your new
printer will look like the ones that your old 86XX printer printed.
There are three ways to set the printer to Emulation mode:
• Use the DIP switches in the Test and Service DIP switch bank. For
help, see the following procedure.
• Use PrintSet to select either 100 dpi (10 mil) or 66 dpi (15 mil) mode.
For help, see the PrintSet online help.
• Use the IPL command set to select Emulation mode. For help, see the
IPL Programming Reference Manual.
To set the printer to Emulation mode using DIP switches
1 Upload label formats, fonts, and graphics from the 8636 or 8646
printer to the host computer.
2 Turn the On/Off switch to the off position.
3 Disconnect the 86XX printer and install your printer. See Chapter 1 for
information on installing your printer.