


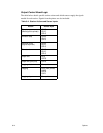

Options 8-11
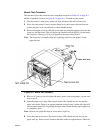
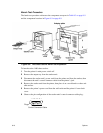
7 Place a jumper from pin 9 to pin 10 (ground). Using the printer’s power cord in place
of the unit’s power cord, plug the printer’s power cord in the stacker unit, then into the
wall outlet.
8 With the power applied to the stacker unit, the exit roller motor (ERM-M1) will be off.
This will signal the output control board to turn the exit roller motor (ERM-M1) on.
9 Remove the jumper from pin 9 and pin 10.
10 Lift the paper tray full actuator to enable photosensor OLLS to signal the output con-
trol board to cause the elevator motor (OEM-M2) to turn on and lower the output tray
guide.
11 As the output tray guide reaches its lowest allowable position, photosensor OELS is
enabled and signals the output control board to turn the elevator motor (OEM-M2) off.
12 Releasing the paper tray full actuator then enables photosensor OULS to signal the
output control board to turn the elevator (OEM-M2) on and raise the output tray guide.
13 As the output tray guide reaches its highest allowable position, the paper tray full actu-
ator enables both photosensor OLLS and photosensor OULS, which in turn signal the
output control board to turn the elevator motor (OEM-M2) off.
14 Disconnect the power cord from the stacker, then place a jumper from pin 3 to pin 6
and a second jumper from pin 2 to pin 7.
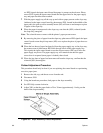
15 Reconnect the power cord, then (from the printer side of the unit) insert a folded piece
of paper into the unit to trigger the actuator and enable photosensor OEPS. This will
signal the output control board to turn the jogging rear motor (OJRM-M3) on.
16 After jogging has occurred, remove the piece of paper then reinsert it. This will again
trigger the acturator and enable photosensor OEPS. This will signal the output control
board to turn the jogging front motor (OJFM-M4) on.
17 The procedure is completed. Disconnect the power cord, remove the jumpers, then
reinstall the unit into the printer.