


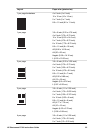

Layout Paper size (photo size)
8 x 10 inch (3.5 x 4.75 inch)
8.5 x 11 inch (3.5 x 5 inch)
A6 (4.77 x 6.92 cm)
A4 (9 x 13 cm)
Hagaki (4.52 x 6.5 cm)
L (3.96 x 5.7 cm)
9 per page 3.5 x 5 inch (1 x 1.375 inch)
4 x 6 inch (1.125 x 1.5 inch)
5 x 7 inch (1.5 x 2 inch)
8 x 10 inch (2.25 x 3 inch)
8.5 x 11 inch (2.5 x 3.25 inch) – Wallet
size
A6 (3.07 x 4.05 cm)
A4 (6.4 x 8.4 cm)
Hagaki (2.9 x 3.86 cm)
L (2.53 x 3.36 cm)
Note The printer may rotate the photos to fit the layout.
Improving photo quality
The printer provides a variety of enhancements that can improve the quality of a photo
printed from a memory card. These print settings do not change the original photo. They
only affect printing.
Adjust photos with poor brightness
1. Select View & Print and press OK.
2. Select Wizard and press OK.
3. Follow the onscreen instructions to select your paper size and photo, then press
OK to view the menu.
4. Select Edit Photo and press OK.
5. Select Photo Brightness and press OK.
6. Press
and to increase or decrease the photo brightness to the desired level,
then press OK.
Remove red eye from photos
The automatic red eye removal feature is enabled when you turn on the Photo fix function.
Enabling the Photo Fix function applies Smart Focus, Adaptive Lighting, and red eye
removal features to selected photos.
➔
Press Photo Fix to enable the Photo Fix function.
Chapter 3
(continued)
26 HP Photosmart D7100 series