


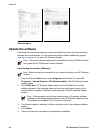

Automatically clean the printhead
If you notice white lines or streaks on the photos you print, or in the color blocks of the
self test report, use this procedure to clean the print head. Do not clean the print head
unnecessarily, as this wastes ink and shortens the life of the ink nozzles on the print head.
1. Load paper in the Main tray. Use plain paper to conserve photo paper.
2. Select Settings and press OK.
3. Select Tools and press OK.
4. Select Clean printhead and press OK.
If print quality still seems poor after you clean the print head, try aligning the printer using
the procedure described in Aligning the printer. If print quality problems persist after
cleaning and aligning, contact HP support.
Manually clean the ink cartridge contacts
Clean the copper-colored ink cartridge contacts if a message appears on the printer
screen that says a cartridge is missing or damaged.
Before cleaning the ink cartridge contacts, remove the ink cartridge and verify that
nothing is covering the ink cartridge contacts or the ink cartridge slot, then reinstall the
ink cartridge. If you continue to get a message that says a cartridge is missing or
damaged, clean the ink cartridge contacts. If you still get this message after cleaning the
contacts, you will need a replacement ink cartridge. Remove the affected ink cartridge
and look at the end-of-warranty date on the bottom, in YYYY/MMM/DD format. If it is
before the end-of-warranty date, contact HP support to obtain a replacement ink
cartridge.
To clean the ink cartridge contacts:
1. Gather the following items to clean the contacts:
– Distilled, filtered, or bottled water (tap water may contain contaminants that can
damage the ink cartridge)
Caution Do not use platen cleaners or alcohol to clean the ink cartridge
contacts. These can damage the ink cartridge or the HP Photosmart
printer.
– Dry foam rubber swabs, lint-free cloth, or any soft material that will not come
apart or leave fibers.
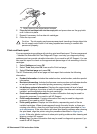
2. Open the top cover of the printer.
3. Squeeze the gray tab below an ink cartridge slot to release the gray latch inside the
printer, then lift the latch.
Caution Do not remove multiple ink cartridges at the same time. Remove
and clean each ink cartridge one at a time. Do not leave the ink cartridge
outside the printer for more than 30 minutes.
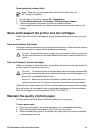
4. Lightly moisten a swab or cloth with water and squeeze out any excess water.
5. Hold the ink cartridge by its handle and gently wipe only the copper-colored contacts
with the swab or cloth.
Chapter 6
38 HP Photosmart D7100 series