


21
Chapter 2: Installation
Power On
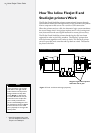
Turn on the computer and the printer to make sure they both work.
The printer power switch is located next to the power cord on the
back of the machine, behind the keypad. When the paper is properly
loaded and the printer is powered up, the carriage will move toward
the left side of the machine, then return to the opposite side to park
in the Service Station. The OK light will turn red and the Square
light will turn green on the front panel after the start-up process has
nished.
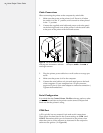
If no paper is loaded when the printer is powered up, the printer
displays an error message. The OK light will turn red and the Circle
light will turn orange. This combination of lights indicates a paper
out error. The keypad buttons do not work unless paper is properly
loaded—or a small piece of masking tape is placed over the Paper
Out sensor on the back of the printer. Once paper is loaded or the
sensor is taped over, press the Start/Stop button to clear the orange
circle and regain use of the keypad.
Installing FlexPlot and
the Control Center
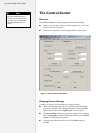
The printer includes two software interfaces: FlexPlot and the
Control Center. FlexPlot will import and queue plot les from
many design programs to optimize production operations. The
Control Center is an interface for adjusting parameters to optimize
printer performance. The printer comes with a CD-ROM which has
Microsoft Windows
®
2000/XP/Vista versions of the programs as
well as PDF user guides and the required Adobe
®
Acrobat
®
reader.
1. Power on the computer and Windows
®
.
2. Insert the Ioline CD-ROM into the CD-ROM drive (usually D:).
3. The installation program should start automatically. If it does
not:
a. Select the Start button.
b. Choose Run.
c. Type D:\IOSETUP (substitute the correct letter if the CD-
ROM drive letter is not D:) and Click OK.
4. Follow the instructions that appear on the screen.
5. The FlexPlot User Guide has details on using the FlexPlot
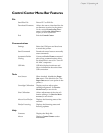
software. In this manual, see the section The Control Center for
more details about the Control Center software.
Keep hands and loose
clothing away from all
moving parts of the
printer. Make sure the Service
Station opening in the right end
plate is not obstructed and that
the stall latches are lowered.
Caution
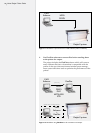
In this manual the right and left
side refers to the right and left
side of the front of the printer.
Design software usually refers
to the Origin (or Start Point)
as “lower left” because it is the
lower left corner of a plot. The
plot is usually oriented in the
printer rotated 90 degrees coun-
ter clockwise as shown in Figure
5. The lower left corner of the
plot is physically on the right side
of the printer.
Note
i