


34
Ioline FlexJet E User Guide
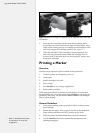
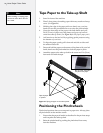
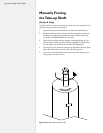
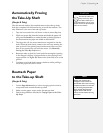
Tape Paper to the Take-up Shaft
1. Stand in front of the machine.
2. Place 3 short pieces of masking tape within easy reach on the top
cover. (See Figure 21.)
3. Holding the edge of the paper with one hand, use your free
hand to lower the pinchwheel lever to raise the pinchwheels.
4. Grasp the front edge of the paper with both hands and pull
20-in (51-cm) of paper over the platen and gray top bar and
under the take-up shaft. (See Figure 20 for the proper paper path.)
5. Add tension to the feed roll by applying gentle pressure using
the bottom of your foot.
6. To align the paper, gently pull it forward and side to side until
the tension feels even.
7. Press and hold the paper on the center of the platen with your left
hand, then lower the pinchwheels to lock the paper in place.
8. Attach the paper to the take-up shaft in the center and 2-in (5-cm)
from each end with the tape.
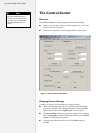
Positioning the Pinchwheels
Pinchwheel position does not correspond to paper size. Always place
all pinchwheels at the machine center.
1. Ensure that the paper is loaded as described in the previous steps
and is taped to the take-up shaft.
2. Raise the pinchwheels by pushing the pinchwheel lever away
from the machine.
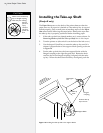
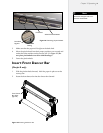
When installing or retaping paper,
remove the front dancer bar and
set it aside.
Note
i
Figure 21. Taping the paper to the take-up shaft.
Tape the paper
in 3 places
Do not cover the hole in
the platen with paper.