


33
Chapter 3: Operation
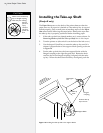
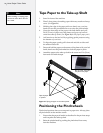
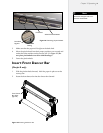
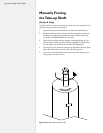
take-up shaft into place until it is seated in the support block.
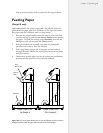
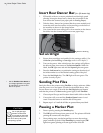
Feeding Paper
(FlexJet E only)
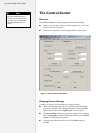
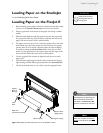
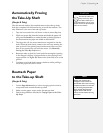
Figure 20 represents the proper paper path. The left side of the dia-
gram shows the paper path for a 1H FlexJet E. The right side shows
the proper path for a FlexJet E with 2 or more heads.
1. Remove any printed markers from the take-up shaft and make
sure the carriage is parked in the Service Station before feeding
the paper. (To park the carriage, press Start/Stop. Wait for the
OK light to turn red and press the Clean button.)
2. If the pinchwheels are lowered, raise them by pushing the
pinchwheel lever away from the machine.
3. Pull a long leader of paper off of the paper roll and insert it
through the stand, behind the plotting head between the platen
and pinchwheels.
4. Temporarily lock the paper in place by pulling the pinchwheel
lever toward the machine to lower the pinchwheels.
Figure 20. The correct paper feeding path on the Ioline FlexJet E printers. (See the
StudioJet Quick Start Guide for paper path instructions for the StudioJet.)
Take-up
Shaft
Feed Roll
Proper Paper Path
1H FlexJet E
Front
Dancer Bar
Proper Paper Path
2H+ FlexJet E