


30
Ioline FlexJet E User Guide
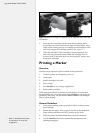
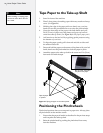
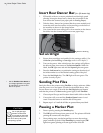
3. Insert the new cartridge with the print head pointing down
toward the rear of the stall and at a slight outward angle. Press
rmly while rotating the top of cartridge toward the back of the
stall until it stops in an upright position. (See Figure 17.)
4. Close the stall latch. If the cartridge is inserted properly, the
latch will snap shut and securely hold the cartridge. Do not
force the latch. If the latch does not close properly, remove and
reinsert the cartridge.
Printing a Marker
Overview
The basic steps required to print a marker on the printer are:
1. Turn the printer and computer power on.
2. Load paper.
3. Install cartridge in the stall.
4. Set an origin.
5. Start FlexPlot or your design application.*
6. Send marker/plot les.
These steps are outlined in the next several sections. In most cases
the design les are sent to the printer from FlexPlot or the design ap-
plication. If necessary, use the Ioline Control Center to send design
les or adjust settings.
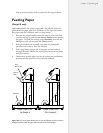
General Guidelines
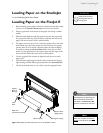
1. Good paper loading makes good plots. Follow loading instruc-
tions carefully.
2. Ensure that the paper roll is properly loaded on the feed shaft.
Paper width determines the roll’s position on the shaft.
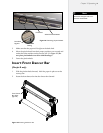
3. Keep the plastic feed shaft block clean and well lubricated.
4. Use the FlexPlot software for optimal le management and
printing throughput.
Figure 17. Insert ink cartridge at an angle into the cartridge bay. Lock in place with
the stall latch.
* Refer to the FlexPlot User Guide
for information on set-up and
conguration.