


45
Chapter 4: Routine Maintenance
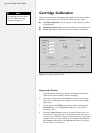
Motion Adjust (Carriage Scan
Alignment)
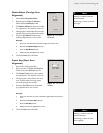
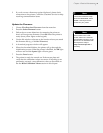
1. Press Select Alignment Plot.
2. Browse to the c:\Ioline\Calibration
folder. Select the 40X8.plt test le.
3. The Motion Adjust box has one number
for adjustment. The default value is 0.
4. Changing the values affects the next scan,
created when moving from left to right.
5. Press the Set Motion button after
making adjustments to the values.
Example:
a. Lines from the second scan shift left to align with the rst scan.
b. Decrease the Motion Adjust value by 1.
c. Press the Set Motion button.
d. Repeat the test until alignment is correct.
6. Click on Done when nished.
Frame Gap (Paper Scan
Alignment)
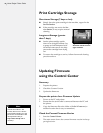
1. Press Select Alignment Plot.
2. Browse to the c:\Ioline\Calibration
folder. Select the 40X8.plt test le.
3. The Frame Gap box has one number
for adjustment. The default value is 0.
4. Changing the values affects the next
scan, created when moving paper
forward through the printer.
5. Press the Set Gap button after mak-
ing adjustments to the values.
Example:
a. Lines from the next scan have a small space gap between the previous
scan.
b. Decrease the Frame Gap value by 1.
c. Press the Set Gap button.
d. Repeat the test until alignment is correct.
6. Click on Done when nished.
Figure 32. The Motion
Adjust Box.
Figure 33. The Frame
Gap Box.
Adding (+) numbers moves the
second scan left.
Subtracting (-) moves the second
scan right.
Note
i
Adding (+) numbers moves the
scans further apart.
Subtracting (-) moves the scans
closer together.
Note
i