


43
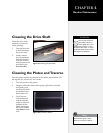
Chapter 4: Routine Maintenance
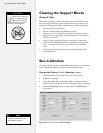
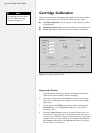
Use the Control Center to Gather the Calibration Data
1. Open the Control Center program.
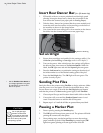
2. Select Tools>Size Calibration from the Menu Bar. The win-
dow in Figure 30 will appear:
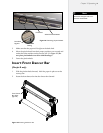
3. Press the Send Size Plot button to print the factory stored
calibration box. The printer will print a box that is 40” (102-cm)
long on the X-axis and 30-in (76-cm) wide on the Y-axis.
4. Precisely measure both sides (X) and the top and bottom (Y) of
the box and record the results. Better accuracy in measurement
equals better calibration.
5. Take the average of the horizontal (Y) values by adding them
together and dividing by 2. Repeat this procedure for the verti-
cal (X) values.
Example:
If X1 = 39.750-in and X2 = 39.700-in
The sum is 79.450-in (39.750-in + 39.700-in = 79.450-in)
The average is 39.725-in (79.450-in / 2 = 39.725-in)
The X calibration value is the average, 39.725-in
Enter the Calibration Data:
1. Enter the measured values in the boxes in the Calibration win-
dow. Make sure the printer is in START (green light) mode.
Select the Set Calibration button.
2. The Control Center will send the calibration values to the
printer and the new Calibration Setting will be displayed in
the boxes in the window pictured in Figure 31.
3. Click on Done when nished.
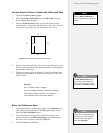
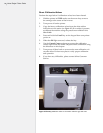
Figure 30. The Calibration box and measurements.
Y1
Y2
X1 X2
~40 in.
Only use Reset Calibration to
restore original factory calibration
settings.
Note
i
The factory-set calibration values
are written on a small sticker on
the under side of the right end
cover. (See Figure 33.)
Hint
The Get Plotter Data button
will read the stored calibration
settings from the printer and dis-
play them in the Factor windows.
Hint