


40
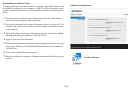
LiteShow Menu Options
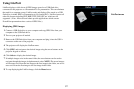
Download
This menu allows the user to download the LiteShow Utility to their computer.
Follow the Download LiteShow Utility instructions below.
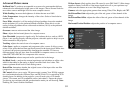
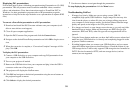
System Status
This menu allows the user to review the network and connection status, and the
source and projector information. This is particularly useful when troubleshooting.
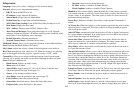
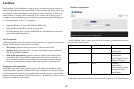
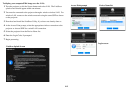
Basic Projector Control
Note: To gain access to the Basic Menu, you must be logged in as a Basic or Admin
User.
This menu allows the user to control many of the
projector’s Basic Picture and
Setup OSD menu features through the network. These include: Power on/off,
Brightness, Contrast, Sharpness, Color, Tint, Auto Image, Aspect Ratio, Apply Pre-
sets, Custom Key, Blank Key, source, AC
Power, Internal Speakers, Audio Inputs,
Volume, Mic Volume and Mute.
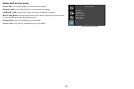
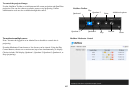
Moderator Control
Note: To gain access to the Moderator Control Menu, you must be logged in as a
Basic or Admin User.
This menu allows the user to control who displays to the projector. Note: Up to 32
computers can be connected to the LiteShow network, however only four
computers can be displayed simultaneously. See instructions below.
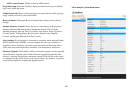
Admin Menu
Note: To gain access to the Admin Menu, you must be logged in as an Admin User.
Use the Admin Menu for configuring and controlling the projector via a web
browser, setting up failure and warning alerts via email, managing the projector via
SNMP.
Notes: Projector web pages and
emails sent by the projector are always displayed in
English language. Select the web pages language (English, Traditional Chinese,
Simplified Chinese, Korean, German, French, Italian, Spanish, Polish, Swedish,
Dutch, Portuguese, Russian, Finnish, Norwegian, Turkish, or Danish) on the home
page. For network control, you can access the projector through Port 23 (Telnet).
We use the same control codes on serial as we do over the network. InFocus
network control uses the Telnet packet structure.
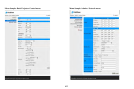
Network Setup: Befor
e the LiteShow features can be used, the projector must be
configured within this submenu for your network. Consult with your network
administrator before entering information into this submenu. Incorrect network
information may cause problems on your network. Note: To enable network
functions at all times (even when the projector is powered off), the Network item in
the Always-On Functions submenu in the Setup menu must be set to Yes (not No).
IP Setup:
Wired LAN settings if DHCP is turned off or not available on the
Wired LAN.
DHCP Server Setup: Th
e projector acts as a DHCP host whenever hosting a
Wireless LAN and/or whenever connected to a Wired LAN which doesn’t
include a DHCP Host.
Wireless Setup: IP configu
ration of the Wireless LAN – these control how the
projector’s Wireless LAN appears to computers on the Wireless network
hosted by the projector.
GateKeeper: Client computers
on the Wireless LAN can access the broader
LAN/Internet over the Wired LAN connection if enabled here. Internet Only
blocks IP addresses on the same LAN subnet as the projector, but allows
access to other IP addresses.
CLI Pass-Through: The projector includes a basic T
elnet engine. You can
“Enable” an incoming Telnet connection in which the projector will parse and
respond to CLI commands received on this port (23).
SNMP: Configure Simple Network
Management Protocol settings.
Crestron Control System: Enable
control by Crestron systems.