


Getting Started - RAID Array 410 for Windows NT – Intel
iv EK–SMRAC–IG. B01
3.7 Saving the RAID Configuration ............................................................................... 3–12
4 Completing your Configuration Setup under Windows NT
4.1 Completing Configurations under Windows NT......................................................... 4–1
4.1.1 Verifying that hszdisk.sys Loaded........................................................................... 4–1
4.1.2 Completing a New RAID Array Configuration........................................................ 4–2
4.1.3 Changes to RAID Array Configuration ................................................................... 4–7
Appendix A Configuration Records – Blank Forms
Appendix B Accessing the Command Line Interpreter (CLI)
Figures
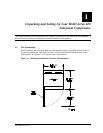
1–1 Minimum Installation Clearance Measurements ......................................................... 1–1
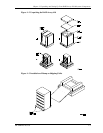
1–2 Unpacking the RAID Array 410 ................................................................................. 1–3
1–3 Installation of Ramp on Shipping Pallet ..................................................................... 1–3
1–4 PC (Program) Card Slot Location............................................................................... 1–6
1–5 StorageWorks SCSI Bus Port and SCSI ID Assignment............................................. 1–7
1–6 SWXSC-AA Components.......................................................................................... 1–9
2–1 Connecting SCSI Cable.............................................................................................. 2–3
2–2 SCSI Cable Connection to Controller (Single Controller)........................................... 2–4
2–3 SCSI Cable Connection to Controller (Dual Controller) ............................................. 2–4
3–1 RAID Manager Main Window (Upper Portion).......................................................... 3–2
3–2 The System ID Window............................................................................................. 3–3
3–3 Controller Configuration Window (Upper Portion)..................................................... 3–4
3–4 Physical View ............................................................................................................ 3–6
3–5 Updated Physical View .............................................................................................. 3–7
3–6 Create Window .......................................................................................................... 3–7
3–7 Updated Physical View – Disk (JBOD) Added........................................................... 3–8
3–8 Updated Physical View – Stripeset Added.................................................................. 3–9
3–9 Updated Physical View – Mirrorset Added............................................................... 3–10
3–10 Delete Window ........................................................................................................ 3–11
4–1 How The hszdisk Entry Appears When It Loads Successfully .................................... 4–1
4–2 How the hszdisk Entry Appears When It Fails To Load.............................................. 4–2
4–3 Disk Administrator Screen Display............................................................................. 4–3
4–4 Partition Pull-Down Menu.......................................................................................... 4–5
4–5 Create Primary Partition Window............................................................................... 4–5
4–6 Tools Pull-Down Choices........................................................................................... 4–6
4–7 Format Menu.............................................................................................................. 4–7