


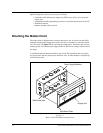


Rack Mounting
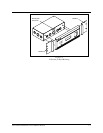
The two L-shaped brackets and the box cover supplied with the master clock can be used
to install it in a standard 19-inch (48.3 cm) rack. See Figure 1-3 on page 1-7.
To rack mount the clock:
1. Place the master clock on its back with the display unit facing up and the key pad to
the right.
2. Remove the two screws securing the display unit to the backbox.
3. Lift the display unit up and away from the backbox. Two rivets at the bottom of the
cover will prevent you from lifting it straight up.
4. Unplug the ribbon cable from the back of the display unit to disconnect the power
supply.
5. Detach the display unit from the wall mount plate by removing the four screws on the
back of the display unit. (IMPORTANT: Do not lose these screws. They are a specific
length so they do not interfere with the circuit board inside the display unit. Using any
other screws to attach the display unit to the case will void any warranty.)
6. Remove the rectangular knock out near the top of the power supply. See Figure 1-3
on page 1-7.
7. Using the four screws removed in step 5, attach the display unit to the bottom of the
power supply. To assist you, there are holes opposite the four screw holes where you
can fit a #1 Philips screwdriver with an 8-inch (20.3 cm) blade.
8. Reconnect the ribbon cable from the power supply to the display unit.
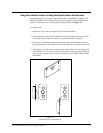
9. Remove the two screws from one side of the display unit, then use them to attach an
L bracket to the side of the unit. See Figure 1-3 on page 1-7. Repeat to attach the
other bracket to the other side.
10. Mount the unit in the rack.
11. Wire the clock before attaching the box cover. See Wiring the Master Clock on
page 1-8.
12. Attach the cover to the power supply using four 6-32 screws. Two of these screws
were removed from the display unit in step 2. The other two were supplied with the
clock.
1-6
24A715/24A715M Master Clock Installation Manual