


Scanning to a computer or flash drive
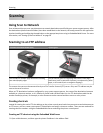
Automatic Document Feeder (ADF) Scanner glass
ABC
Use the ADF for multiple‑page documents. Use the scanner glass for single pages, small items (such as postcards or
photos), transparencies, photo paper, or thin media (such as magazine
clippings).
The scanner lets you scan documents directly to a computer or a flash drive. The computer does not have to be directly
connected to the printer for you to receive images using Scan to Computer. You can scan the document back to the
computer over the network by creating a scan profile on the computer and then downloading the profile to the printer.
Scanning to a computer using the Embedded Web Server
1 Open a Web browser, and then type the printer IP address in the address field.
Notes:
• View the printer IP address on the printer home screen. The IP address appears as four sets of numbers
separated by periods, such as 123.123.123.123.
• If you are using a proxy server, then temporarily disable it to load the Web page correctly.
2 Click Scan Profile > Create Scan Profile.
3 Select your scan settings, and then click Next.
4 Select a location on your computer where you want to save the scan image.
5 Type a scan name, and then a user name.
Note: The scan name is the name that appears in the Scan Profile list on the display.
6 Click Submit.
Note: Clicking Submit automatically assigns a shortcut number. You can use this shortcut number when you are
ready to scan your documents.
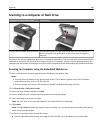
7 Review the instructions on the Scan Profile screen.
a Load an original document faceup, short edge first into the ADF tray or facedown on the scanner glass.
Scanning 146