


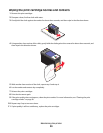


Check ink Check the ink levels, and install new print cartridges if necessary.
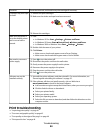
Cartridges may have tape
on them
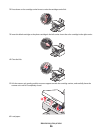
1 Remove the print cartridges.
2 Make sure the sticker and tape have been removed.
1
2
3 Reinsert the cartridges.
Make sure the printer is
set as the default printer
and is not on hold or
paused.
1 Click:
• In Windows XP Pro: Start Settings Printers and Faxes.
• In Windows XP Home: Start Control Panel Printers and Faxes.
• In Windows 2000 or Windows Vista: Start Settings Printers.
2 Double-click the name of your printer.
3 Click Printer.
• Make sure no check mark appears next to Pause Printing.
• Make sure a check mark does appear next to Set As Default.
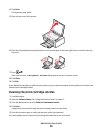
May need to reconnect
power supply
1 Press to turn the printer off.
2 Disconnect the power cord from the wall outlet.
3 Gently remove the power supply from the printer.
4 Reconnect the power supply to the printer.
5 Plug the power cord into the wall outlet.
6 Press to turn the printer on.
Software may not be
installed correctly
1 Uninstall the printer software, and then reinstall it. For more information, see
“Removing and reinstalling the software” on page 55.
2 If the software still does not install correctly, visit our Web site at
www.lexmark.com to check for the latest software.
a In all countries or regions except the United States, select your country or region.
b Click the links for drivers or downloads.
c Select your printer family.
d Select your printer model.
e Select your operating system.
f Select the file you want to download, and then follow the directions on the
computer screen.
Print troubleshooting
• “Improving print quality” on page 45
• “Poor text and graphic quality” on page 45
• “Poor quality at the edges of the page” on page 46
• “Print speed is slow” on page 46
Troubleshooting
44