


Scanning
Using Scan to Network
Scan to Network lets you scan your documents to network destinations specified by your system support person. After
the destinations (shared network folders) have been established on the network, the setup process for the application
involves installing and configuring the application on the appropriate printer using its Embedded Web Server. For more
information, see “Setting up Scan to Network” on page 21.
Scanning to an FTP address
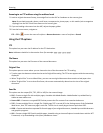
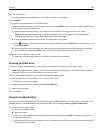
ADF Scanner glass
Use the ADF for multiple‑page documents. Use the scanner glass for single pages, small items (such as postcards or
photos), transparencies, photo paper, or thin media (such as magazine
clippings).
The scanner lets you scan documents directly to a File Transfer Protocol (FTP) server. Only one FTP address may be
used at a time.
Once an FTP destination has been configured by your system support person, the name of the destination becomes
available as a shortcut number, or it is listed as a profile under the Held Jobs icon.
Creating shortcuts
Instead of typing the entire FTP site address on the printer control panel each time you want to send a document to
an FTP server, you can create a permanent FTP destination and assign a shortcut number.
Creating an FTP shortcut using the Embedded Web Server
1 Type the printer IP address into the address field of your Web browser.
If you do not know the IP address of the printer, you can:
• View the IP address on the printer control panel in the TCP/IP section under the Networks/Ports menu.
• Print a network setup page or the menu settings pages and locate the IP address in the TCP/IP section.
Scanning 125