


EtherFast
®
Cable/DSL Firewall Router with 4-Port Switch/VPN Endpoint
Your VPN may require port 500/UDP packets to be passed to the computer that
is connecting to the IPSec server. Refer to “Problem #7, I need to set up online
game hosting or use other Internet applications” for details.
Check the Linksys website for more information at www.linksys.com.
6. I need to set up a server behind my Router.
To use a server like a web, ftp, or mail server, you need to know the respective
port numbers they are using. For example, port 80 (HTTP) is used for web;
port 21 (FTP) is used for FTP, and port 25 (SMTP outgoing) and port 110
(POP3 incoming) are used for the mail server. You can get more information
by viewing the documentation provided with the server you installed. Follow
these steps to set up port forwarding through the Router’s web-based utility. We
will be setting up web, ftp, and mail servers.
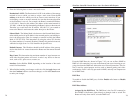
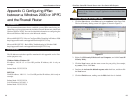
A. Access the Router’s web-based utility by going to http://192.168.1.1 or the
IP address of the Router. Go to the Advanced => Forwarding tab.
B. Enter any name you want to use for the Customized Application.
C. Enter the Ext. Port range of the service you are using. For example, if you
have a web server, you would enter the range 80 to 80.
D. Check the protocol you will be using, TCP and/or UDP.
E. Enter the IP address of the PC or network device that you want the port
server to go to. For example, if the web server’s Ethernet adapter IP address
is 192.168.1.100, you would enter 100 in the field provided. Check
“Appendix G: Finding the MAC Address and IP Address for Your Ethernet
Adapter” for details on getting an IP address.
F. Check the Enable option for the port services you want to use. Consider the
example below:
Customized Ext. Port TCP UDP IP Address Enable
Application
Web server 80 to 80 X X 192.168.1.100 X
FTP server 21 to 21 X 192.168.1.101 X
SMTP (outgoing) 25 to 25 X X 192.168.1.102 X
POP3 (incoming) 110 to 110 X X 192.168.1.102 X
When you have completed the configuration, click the Apply button and then
the Continue button.
85
Instant Broadband
®
Series
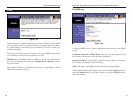
F. Turn off the computer, Router, and cable/DSL modem. Wait 30 seconds,
and then turn on the Router, cable/DSL modem, and computer. Check the
Status tab of the Router’s web-based utility to see if you get an IP address.
4. I am not able to access the Router’s web interface Setup page.
A. Refer to “Problem #2, I want to test my Internet connection” to verify that
your computer is properly connected to the Router.
B. Refer to “Appendix G: Finding the MAC Address and IP address for Your
Ethernet Adapter” to verify that your computer has an IP Address, Subnet
Mask, Gateway, and DNS.
C. Set a static IP address on your system; refer to “Problem #1: I need to set a
static IP address.”
D. Refer to “Problem #10: I need to remove the proxy settings or the dial-up
pop-up window (for PPPoE users).”
5. I can’t get my Virtual Private Network (VPN) Pass-Through working through the
Router (not a VPN tunnel).
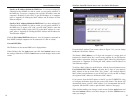
Access the Router’s web interface by going to http://192.168.1.1 or the IP
address of the Router, and go to the Advanced => Filter tab. Make sure you
have IPsec pass-through and/or PPTP pass-through enabled.
VPNs that use IPSec with the ESP (Encapsulation Security Payload known as
protocol 50) authentication will work fine. At least one IPSec session will work
through the Router; however, simultaneous IPSec sessions may be possible,
depending on the specifics of your VPNs.
VPNs that use IPSec and AH (Authentication Header known as protocol 51)
are incompatible with the Router. AH has limitations due to occasional incom-
patibility with the NAT standard.
Change the IP address for the Router to another subnet to avoid a conflict
between the VPN IP address and your local IP address. For example, if your
VPN server assigns an IP address 192.168.1.X (X is a number from 1 to 254)
and your local LAN IP address is 192.168.1.X (X is the same number used in
the VPN IP address), the Router will have difficulties routing information to
the right location. If you change the Router’s IP address to 192.168.2.1, that
should solve the problem. Change the Router’s IP address through the Setup tab
of the web interface. If you assigned a static IP address to any computer or net-
work device on the network, you need to change its IP address accordingly to
192.168.2.Y (Y being any number from 1 to 254). Note that each IP address
must be unique within the network.
84