


NOTE
Make sure that all PCI cards are fully seated in their connectors
.
When correctly seated in its connector, you will notice a firm resistance
when you pull up gently on the card. To keep the cards in place
,
secure them in the chassis with their retaining screws (supplied with
the PCI Expansion System).
The sheer number of PCI cards and device drivers available makes it
impossible for MAGMA to fully test and certify all available PCI cards for
use in the PCI expansion system. Our best advice to you in this regard
is to insist on full PCI Specification compliance from your card and
system vendors. Cards and systems should be at least PCI
Specification Revision 2.0 compliant with 2.1 compliance
recommended. Compliance in your system motherboard, PCI cards
and console firmware (or BIOS) is your best assurance that everything
will install and operate smoothly.
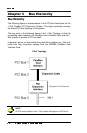
Step Three: Attach PCI Expansion Cable
Carefully position the PCI Expansion System so that the supplied
expansion cable will conveniently reach from the connector of the
CardBus Card to the connector of the 1 Slot chassis.
Attach one end of the PCI Expansion Cable to the CardBus Card and
secure it using the captive thumbscrews on the cable. Carefully route
the cable to the 1 Slot chassis and secure it with the captive
thumbscrews. It is important that the cable be attached securely to the
card connectors at both ends.
Step Four: Install CardBus Host Interface Card
NOTE
CardBus PC Cards can only be used in systems that support CardBus
.
A special keying mechanism prevents insertion in systems that do no
t
support 32-bit CardBus PC cards.
1. Begin installation of your CardBus Host Interface Card by first
powering down your laptop computer. Use the procedures for
shutting down your operating system and shutting off power to
your system provided in your owner’s manual or system
documentation.