


Editing Test Limits
To display the EDIT LIMITS screen, press the Extended Functions key, then select Setup
Autotest, then highlight the Autotest to edit, then press Edit (F2), then select Limits. This screen
lets you specify the PASS/FAIL limits used in tests.
Press the
Ñ or Ò arrow key to highlight the test for which you want to edit the limits.
Press Select (F1) to display the limits screen for the highlighted test. Or, press the number on the
keypad that corresponds to the test for which you want to change the limits.
After editing the selected limits, press Save (F1) to save these changes and to return to the EDIT
LIMITS screen.
If you have created a new Autotest by editing the Autotest name or by editing a factory-
programmed Autotest, and if you want the new test to be the default Autotest, press ESCAPE
until you return to the AUTOTEST SETUP screen, then press Default (F1).
Note: See the individual test sections for information on customizing specific test limits.
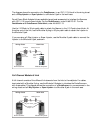
Running Autotest
To display the AUTOTEST: screen, press the AUTOTEST key. This screen is displayed while
Autotest is running. The Autotest name is displayed at the top of the screen and the cable type is
shown in the top center of the screen. Each pair being tested is displayed in the lower left corner of
the screen. The name of each test being run is displayed in the lower right corner of the screen. A
status bar at the bottom of the screen indicates the progress of the Autotest.
Press the ESCAPE key at any time to cancel the Autotest.
Note: The Injector must be attached to the far end of the cable during Autotest. If it is not, the
Scanner screen will display the following:
Searching for Injector . . . (Injector Not Found)
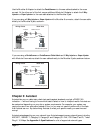
Autotest Results Screen
To display the AUTOTEST RESULTS screen, press the AUTOTEST key, or press the Extended
Functions key and select Memory. This screen is displayed when Autotest completes or when
saved Autotest results are selected for viewing.
The Autotest name is at the top right of the display and the PASS/FAIL indicator is in the center.
The number of failed tests, if any, is displayed next to the PASS/FAIL indicator. An Autotest will
PASS if all the selected tests meet the specified criteria. An Autotest will FAIL if one or more
selected tests fail. When the Margin Display is set to TIA Margin Display an Autotest will
marginally PASS (*PASS) if one or more NEXT, Attenuation or Length measurements marginally
passes. A marginal PASS is defined as a PASS result that is closer to the PASS/FAIL threshold than
the accuracy of the Scanner.
Press View (F1) to display Autotest results, then use the
Ñ or Ò arrow keys to scroll through
the tests. The tests you view depend on the tests you have selected to run in AUTOTEST SETUP.
See Selecting Tests to Run During Autotest for more information.
Press Save (F2) to save test results and exit. See Saving Autotest Results for more information.
Note: The Save (F2) key is unavailable when viewing the AUTOTEST RESULTS screen via the
Extended Functions/Memory feature.